• ABOUT
  • PODCAST
  • BLOG
    • MINIMALISM
    • DIY
    • SEW
    • DECORATE
    • EAT
    • TRAVEL
  • BOOK
  • CONTACT
  • ABOUT
  • PODCAST
  • BLOG
    • MINIMALISM
    • DIY
    • SEW
    • DECORATE
    • EAT
    • TRAVEL
  • BOOK
  • CONTACT
Drafting and Sewing Leggings // Stretch Yourself
January 11, 2013

This series is sponsored by Baby Lock.  For over 40 years, Baby Lock has been dedicated to the love of sewing by creating machines for sewing, embroidery, quilting and serging – all with ease-of-use, high quality and a touch of elegance.

I’ve always loved sewing with knits, but recently I’ve developed an even greater obsession with it because of leggings. I’ve never had a problem finding leggings that fit (they’re all so stretchy most everyone can find the right size).

What I have really enjoyed is making leggings in different colors, prints, and materials than are available in stores! The process of drafting your own to measurements is really quite easy, and once you have the pattern piece made, watch out, because you might become addicted to making your own leggings!

Draft and Sew Leggings - One Little Minute Blog - Great Simple Tutorial-09

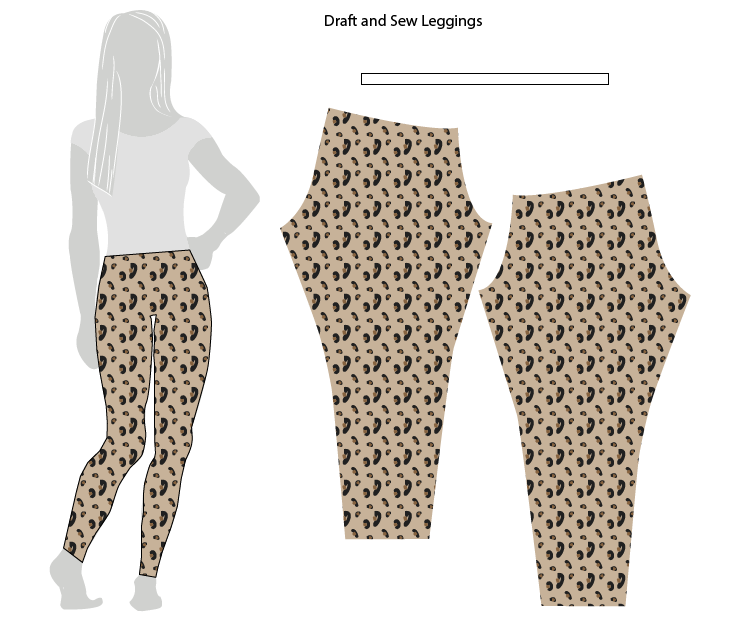
Let’s just all admire my leopard print pattern for a second. I’m a total amateur designer, and have to say I’m pretty proud of this one! Plus, my favorite homemade leggings so far are made from a leopard print lightweight sweater knit. They are on a very tight rotation.

Notice that to make a pair of leggings you will only need two pieces of fabric, cut to your pattern, and one length of elastic. It doesn’t get much more simple than that!

Making Leggings- One Little Minute Blog - Measurements-10
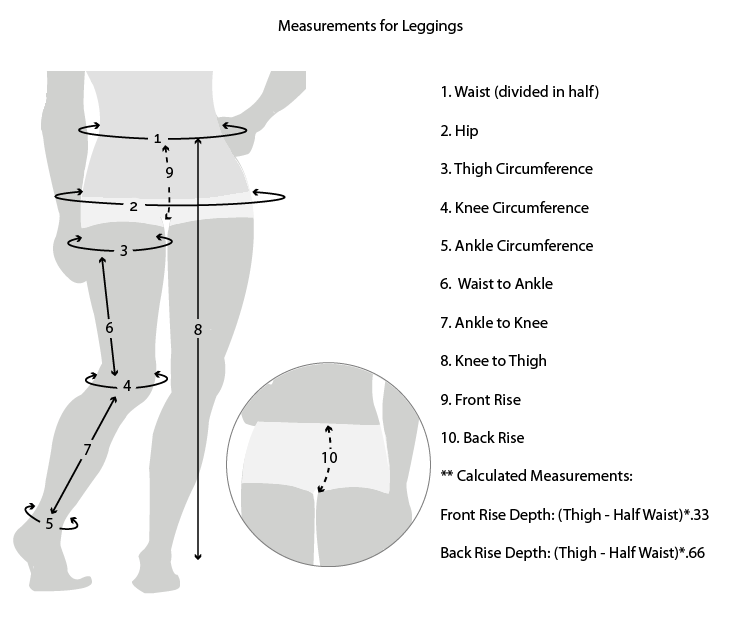
To get started, you’ll want to take the following measurements and write them down somewhere. It will be helpful to wear tight fitting clothing and mark where you take your measurements with chalk, like Mim taught you in her drafting a tee post. I’ll explain each measurement in a little more detail in case you don’t recognize some:

Waist: Technically, this would be your natural waist, or the most narrow part of your abdomen. For this pattern, though, you’ll want to measure the circumference of wherever you’d like the waistband of your leggings to hit.

Hip: The circumference around the fullest part of your bum.

Thigh: The circumference around the widest part of your thigh. Mark where you take this measurement with chalk, or a washable marker

Knee: The circumference around the top of your knee, above the knee cap, with your leg straight.

Ankle: The circumference around your ankle, at the length you’d like the hem of your leggings.

Waist to Ankle: Distance from where you took your waist measurement to where you took your ankle measurement (or the desired hem length).

Ankle to Knee: Distance from where you measured your ankle to where you measured your knee.

Knee to Thigh: Distance from where you measured your knee to where you measured your thigh.

Front Rise: Squeeze a ruler between the top of your thighs, so it sticks out parallel to the floor. Measure from your waist to the ruler.

Back Rise: Squeeze a ruler between your thighs with the ruler parallel to the floor sticking out behind you. Measure from your waist to the ruler. (You may need some help with this one!)

**Rise Depth: This measurement will help form the curves on the front and back of the pattern piece, to allow the upper part of the leggings wrap down between your legs before separating off into two separate leg tubes. I’ve always been a bit mystified by those curvy parts on patterns for pants, but turns out it’s not very difficult to figure out!  To find your Rise Depth, divide your waist measurement in half  (because each pattern piece only covers half of your waist) then subtract that number from your full thigh circumference (because each pattern piece covers one full leg). This gives the full depth. Rise Depth= Thigh-(Waist/2)

Here’s an example using my measurements: Waist: 30″, Thigh: 21″

21-(30/2)= 6, so my Rise Depth is 6″

Now we divide the Rise Depth between the Front and Back to know where to add those inches on the pattern piece. The Front Rise Depth is 1/3 and the Back Rise Depth is 2/3 (to accommodate that fine booty!)

Front Rise Depth = Rise Depth*.33  So, 6*.33 (or 1/3) = 2″ for my Front Rise Depth

Back Rise Depth = Rise Depth*.66  For my Back Rise Depth, 6*.66=4″.

Please don’t get freaked out by the math. It’s really simple, I just explained it as detailed as I could (with lots of examples of calculations) so you can understand the theory rather than just finding the number you need. I hope it helped!

If the fabric you want to use is very stretchy (in this post about knit fabric and selection, I talk all about stretch) you may want to subtract some a bit of negative ease from your circumference measurements (Waist, Hip, Thigh, Knee, and Ankle) before creating your pattern so that your leggings end up tight, not baggy.

For a minimally stretchy fabric (10-25%) I’d suggest subtracting 1/2″. For a very stretchy fabric (25-50%) I’d suggest subtracting 1″.

Draft and Sew Leggings _ One Little Minute Blog - simple!

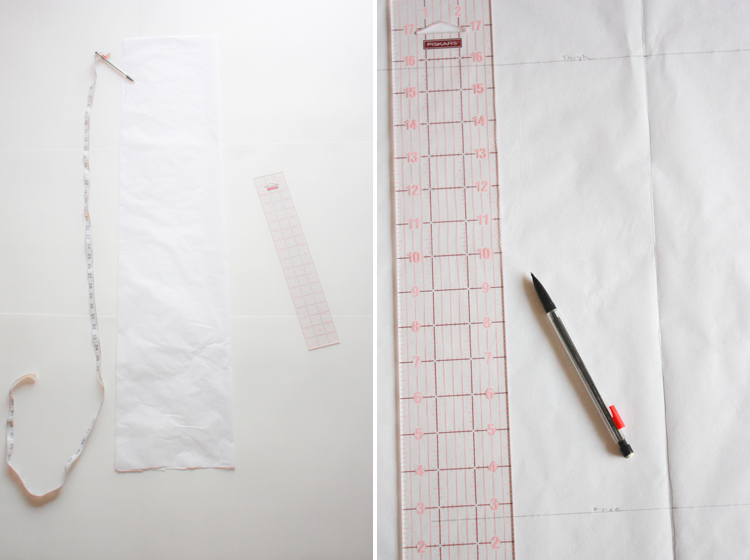
Grab a piece of drafting paper that is a few inches longer than your waist to ankle measurement. You also need a pencil and a ruler. Fold your paper in half lengthwise (hot dog style) and crease the fold. When you unfold it you can begin drafting.

Draft and Sew Leggings - One Little Minute Blog - drafting the pattern-06

The center fold of your paper will serve as the center of your pattern. Lay the paper out flat on a hard surface.

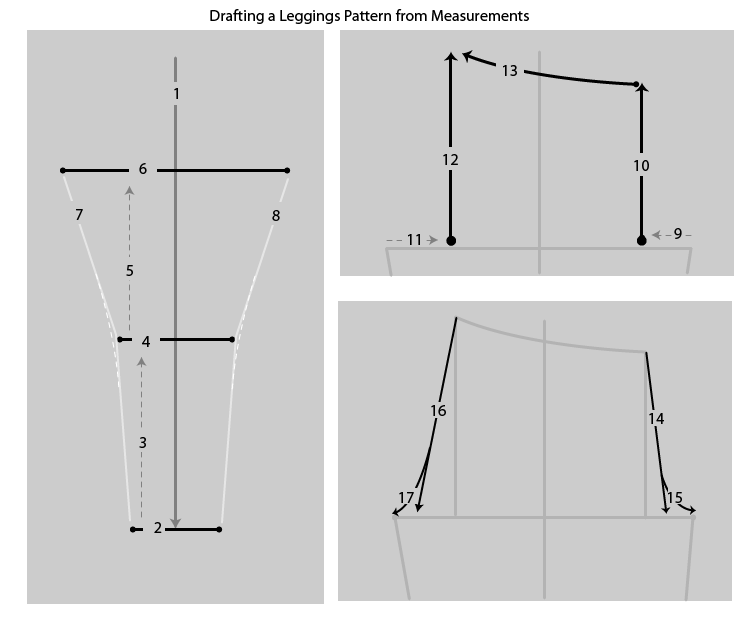
1. Make a mark about 2″ from the top of the page, on the fold, then measure your Waist to Ankle measurement along the fold and make a mark at the ankle.

2. At the ankle mark, draw a line perpendicular to the fold the length of the Ankle Circumference, with the fold  in the middle of the measurement.

3. Measure the Ankle to Knee distance up from the ankle line and make a mark.

4. At the knee mark, draw a line perpendicular to the fold the length of the Knee Circumference, with the fold in the middle of the measurement.

5. Measure the Knee to Thigh distance up from the knee line and make a mark.

6. At the thigh mark, draw a line perpendicular to the fold the length of the Thigh Circumference, with the fold in the middle of the measurement.

7. Connect the ends of the thigh, knee, and ankle lines.

8. Gently round out any corners in your lines.

9. Starting at the end of the right side of the thigh line, measure your Front Rise Depth towards the center and mark.

10. Starting at the Front Rise Depth mark, measure and draw the Front Rise Height up perpendicular to the thigh line.

11. Starting at the end of the left side of the thigh line, measure your Back Rise Depth towards the center and mark.

12. Starting at the Back Rise Depth mark, measure and draw the Back Rise Height up perpendicular to the thigh line.

13. Connect the tops of the Front and Back Rise Height lines with a gentle curve (the back rise height should be slightly higher, if you have a bum!)

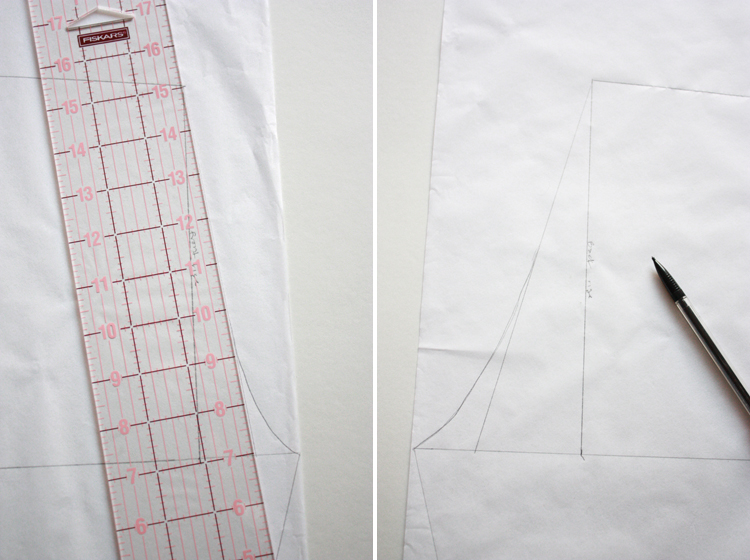
14. Use your ruler to draw a line from the top of the Front Rise Height line to about 1″ from the right end of the thigh line.

15. Starting about half-way down the line you just drew, gently curve out the corner to meet the end of the thigh line.

16. Use your ruler to draw a line from the Back Rise Height to about 1″ from the left end of the thigh line.

17. Starting about half-way down the line you just drew, gently curve out the corner to meet the left end of the thigh line.

Draft and Sew Leggings _ One Little Minute Blog - rise height

Yay! You’ve drafted the whole pattern! Give yourself a pat on the back.

Draft and Sew Leggings - One Little Minute-12

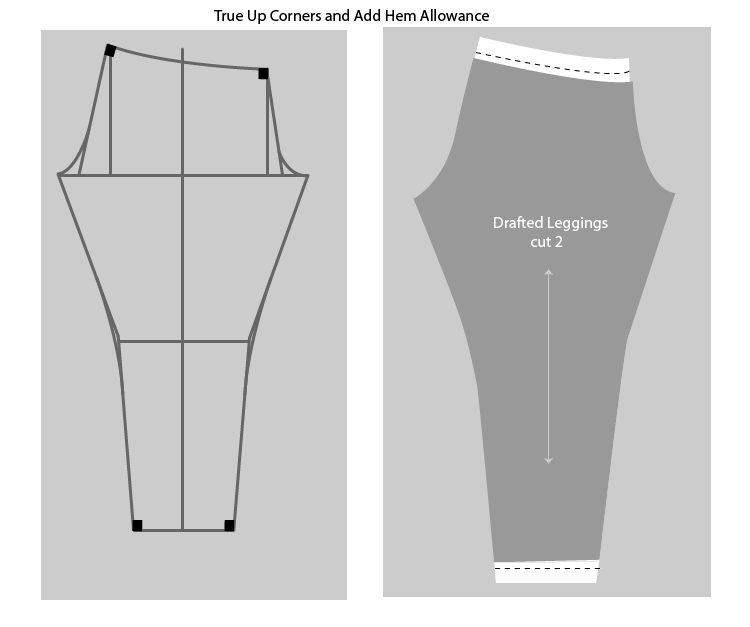
To finish up the pattern, use the corner of your ruler to make sure your four corners of the pattern are all squared off. This is where the pieces will meet, and need to do so at a right angle. Finally, decide what width of elastic you will use for the waist.

Add 2 times + 1/4″ your elastic width (example: for 1″ elastic I’ll add 2 1/4″ ) to the waistband of the pattern. Just measure that distance straight up from the front and back rise heights, and re-connect them with a gently curved line.

For the hem, just lengthen the pattern by the width of hem that you’d like. I used 1/2″.  We won’t add any seam allowance, because we expect the fabric will stretch.

Draft and Sew Leggings _ One Little Minute Blog - easy to follow steps

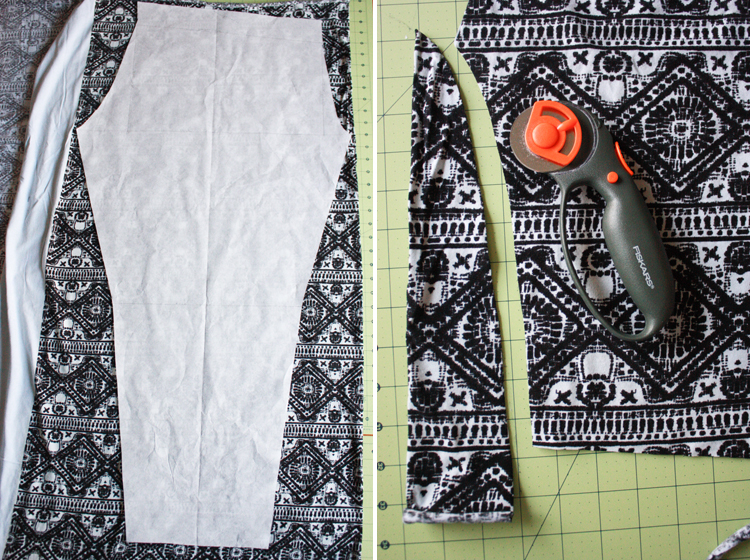
Yay! Now the fun part, cutting and sewing! Use Mim’s tips to find the grain of your knit, ensuring that the stretch is going widthwise across where you lay your pattern.

Using a large cutting mat and rotary cutter is the most precise and fast way to cut, but you can use whatever you’ve got! Fold your fabric in half and lay the pattern on top. Weigh down or pin, and carefully cut around the edge.

Draft and Sew Leggings _ One Little Minute Blog - inseams

In addition to your two pattern pieces, you’ll need a length of elastic about 1″ shorter than your waist measurement. (or just stretch it around your waist until it’s comfortable, overlap the ends 1″ and cut. Sew the elastic together end to end, overlapping the ends by about 1″. You may want to use a zig zag stitch and go over the elastic several times to ensure it stays together!

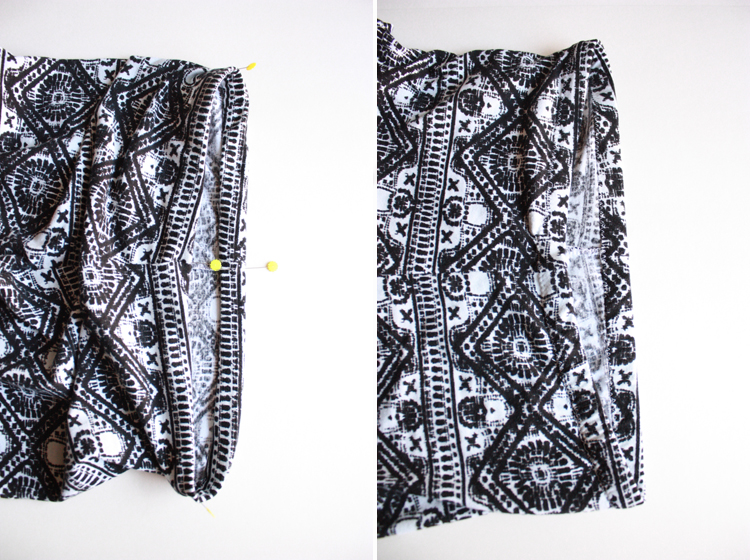
Fold each of the two pattern pieces down the center line, with right sides together. Match up the point of the inseam and the ankle.

Draft and Sew Leggings _ One Little Minute Blog - simple construction

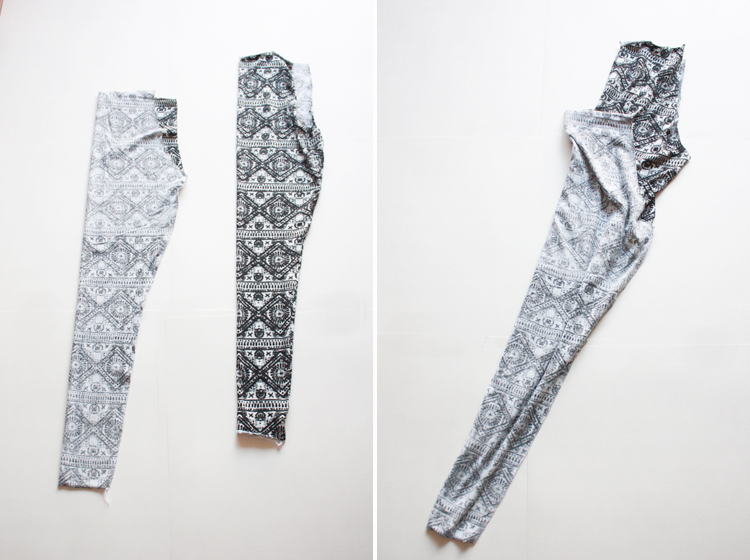
Sew or serge along the inseam line on each piece. Turn one piece right side out and place it inside the other.

Draft and Sew Leggings _ One Little Minute Blog

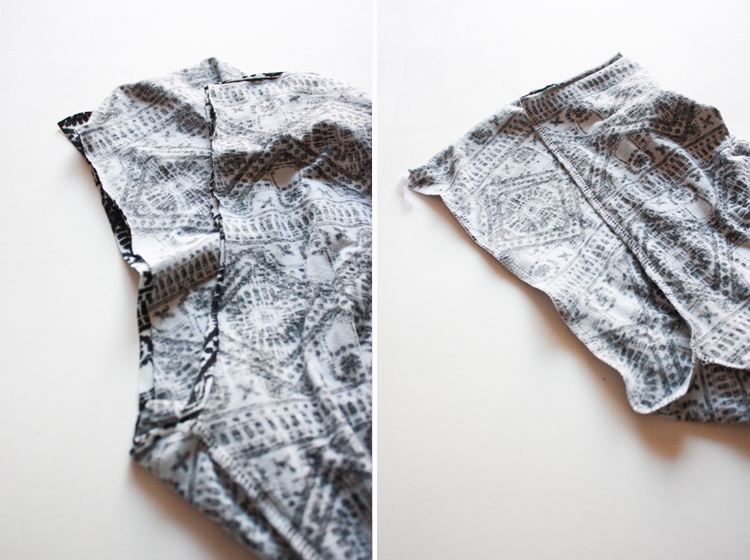
Line up the edges of the pieces, matching the seams you just made. Sew or serge this center line.

Draft and Sew Leggings _ One Little Minute Blog -elastic waist band

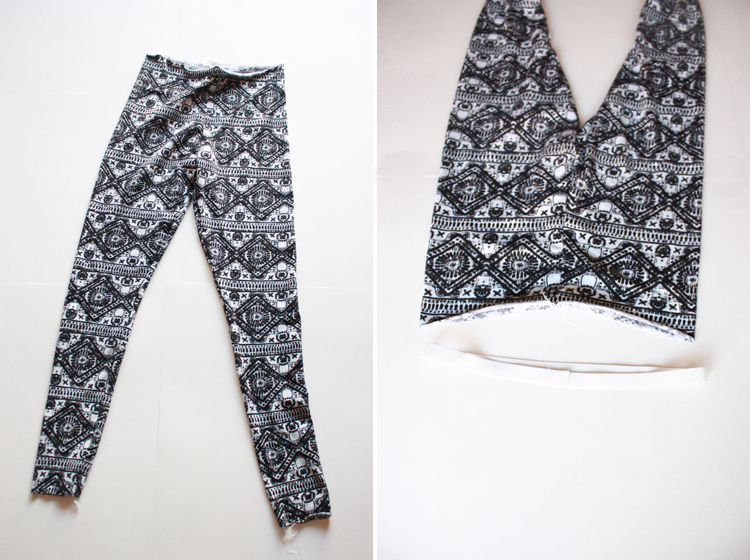
Turn the leggings inside out. Look! Pants! One side of the waistline will be slightly higher than the other. This is the back of the pants. Line the overlapped part of the elastic up with the back center seam on the waistband.

Draft and Sew Leggings _ One Little Minute Blog -elastic waist band insertion

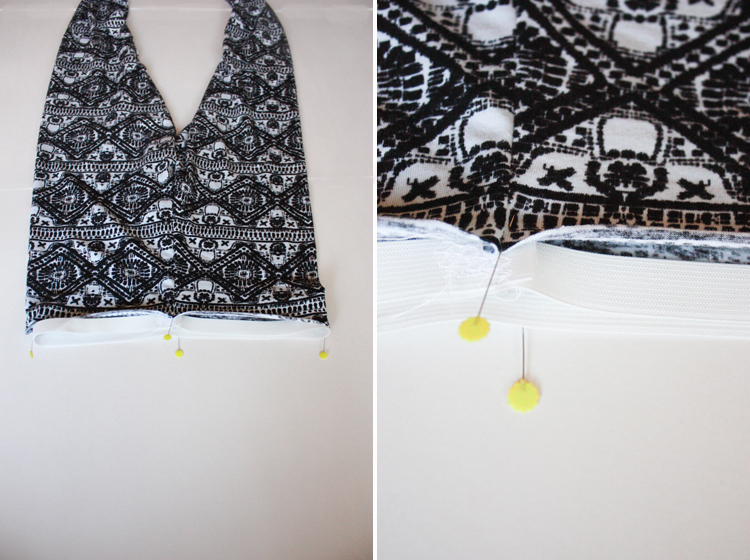
Find the front and sides of the elastic circle, and match them up with the front seam and sides of the leggings. Pin the elastic just inside the legging fabric at the waistband, overlapping the fabric on top of the elastic by only a scant 1/4″.

Draft and Sew Leggings _ One Little Minute Blog -elastic waist band fold

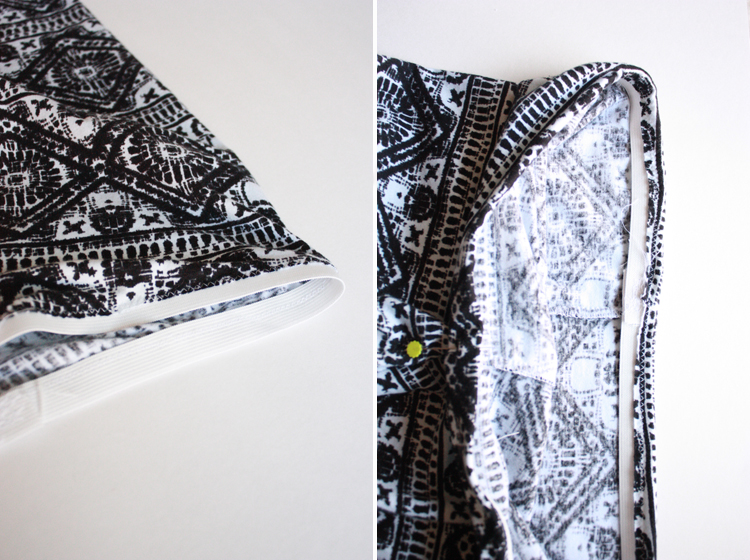
Sew the pants and elastic together along the narrow overlap (with a zig zag or stretch stitch). Fold the elastic down into the pants once, and pull down on the pant fabric, pulling the fold of fabric tight against the elastic.

Draft and Sew Leggings _ One Little Minute Blog -elastic waist band, finished

Fold the elastic down once more, again pulling the fabric tight along the elastic.  Sew along the bottom edge of the elastic on the inside, securing the band. Using this method, the elastic becomes fully encased in the fabric, and is sewn in place (rather than just threaded through as in a casing) so it stays aligned.

Draft and Sew Leggings _ One Little Minute Blog -Finishing

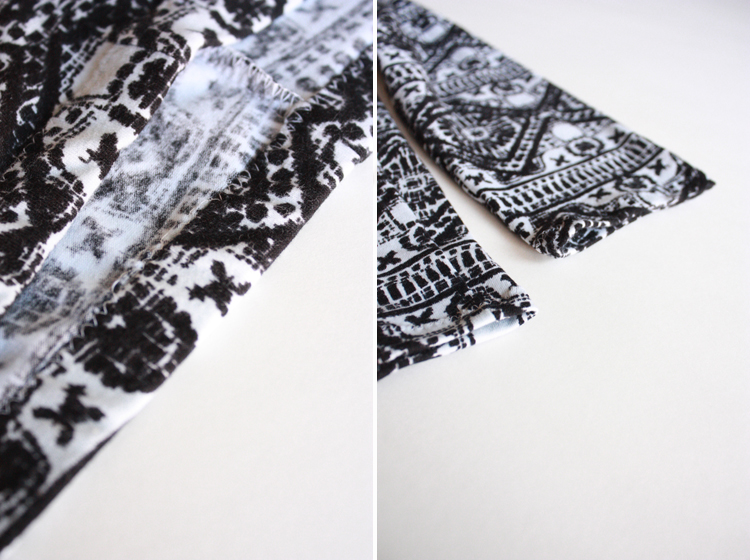
Finish the hems of the pants as you choose (Mim’s post on finishing techniques is very thorough.) On this pair, I simply folded the ends under and zig zag stitched them.

Draft and Sew Leggings - One Little Minute Blog-Tribal Leggings!

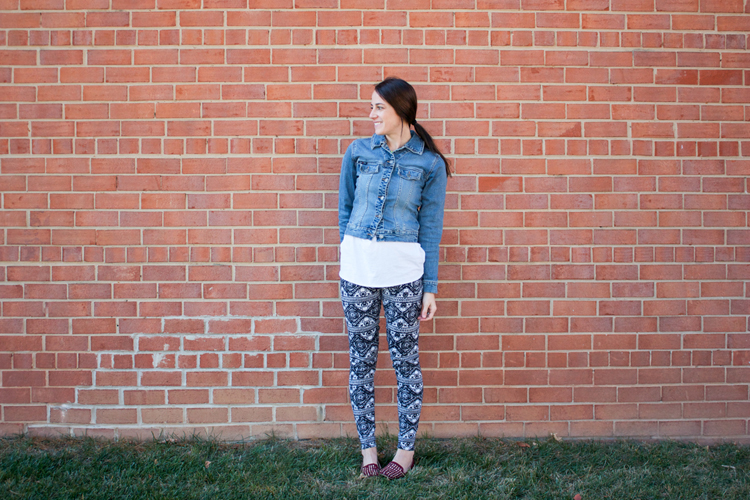
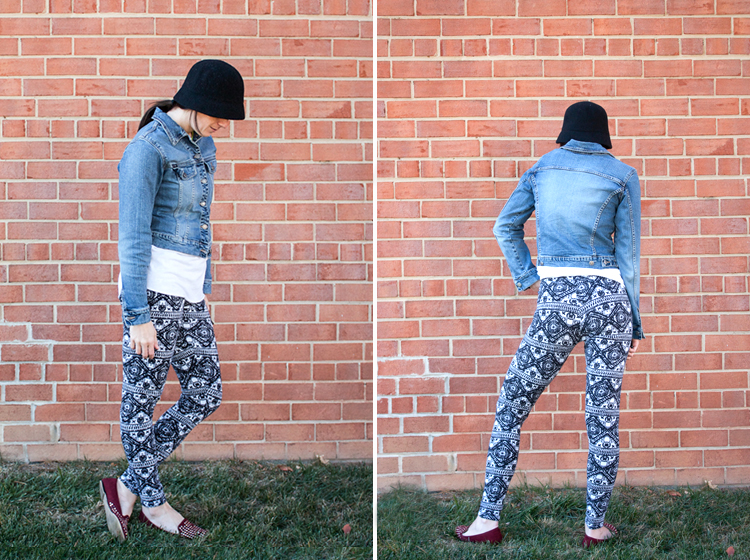
Look at that! You made yourself some homemade (and seriously awesome) leggings!

The first time you make some, it will take a little while because of making the pattern. Once you have your own personal pattern, though, whipping up a new pair (every week…) will be a snap! I’m totally in love with the few pairs I’ve made, and every time I spot some funky fabric I now immediately think “LEGGINGS!!”

Draft and Sew Leggings - One Little Minute Blog-Awesome Tribal LeggingsDraft and Sew Leggings _ One Little Minute Blog -Stretchy Pants!

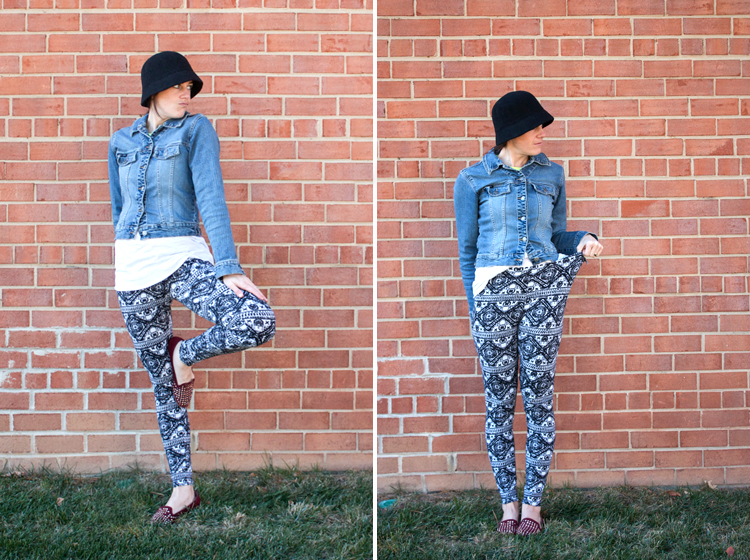
Here I am  just hanging out in my new leggings, doing the tree pose because my pants are stretchy and I can! And check out how stretchy they are! (ha! I must have been getting a little loopy by the time I took these!)

Draft and Sew Leggings - One Little Minute Blog-Awesome Tribal Leggings!! Draft and Sew Leggings _ One Little Minute Blog -Stretchy Tribal Leggings

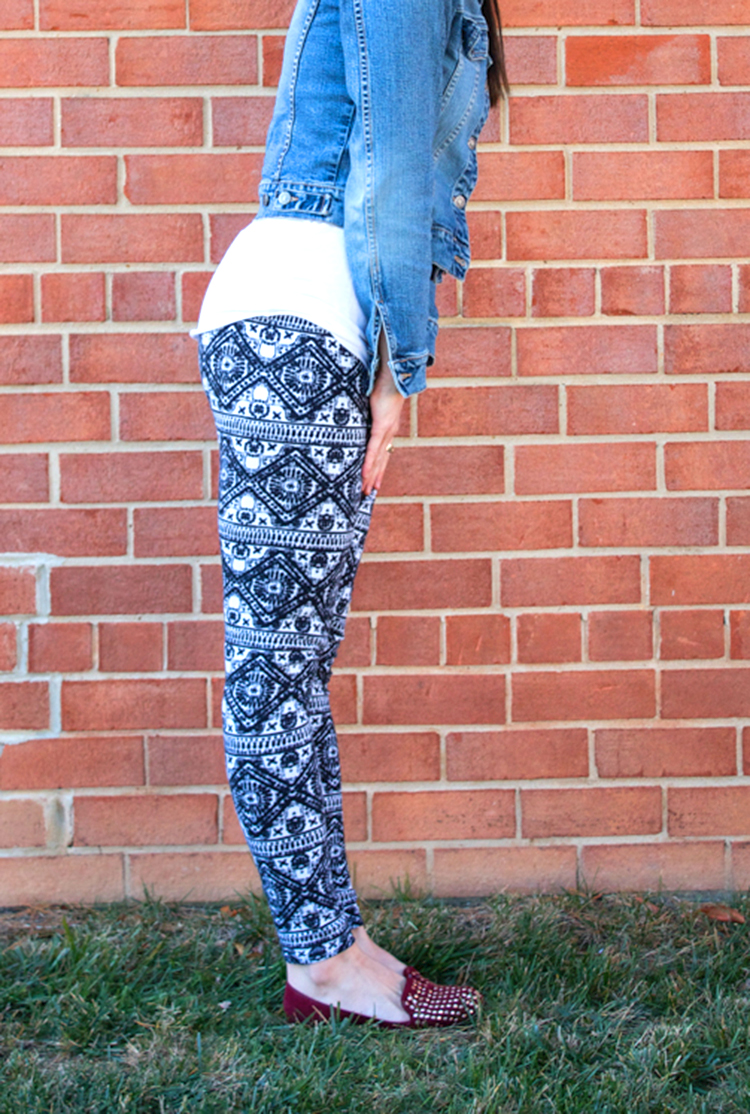
Pattern: self-drafted legging pattern (you can do it!!)

Fabric: Amazing tribal print that someone was getting rid of and handed down to me (score!!) Similarly awesome leggings print styles here, here, here, and I share my favorite places to buy knits on this Knit Fabric post. (Don’t forget to enter the giveaway for $50 to The Fabric Fairy!)

This week we have taught you to make and finish tee shirts, and alter them into dresses and peplum tops. Now with today’s leggings and Miriam’s Maxi Skirts, we’ve pretty much got you covered for a little while!

Tomorrow we’re excited to teach you all about sergers, and more specifically the Baby Lock Diana.  Although anyone with a sewing machine can sew knits no sweat, using a serger takes the construction to another level. Similarly, going from a serger to a coverstitch machine takes things up another notch. The Diana is both a serger and coverstich machine in one! We can’t wait to share the fun things it does to make sewing with knits even more fun.

BabyLock Footer- One Little Minute Blog


Share

Stretch Yourself Series

  • ABOUT

    Welcome! I’m Miranda, the maker mama behind Live Free Creative Company.

  • More Than Enough Book


    Have you ever felt like you were running a race you couldn’t win in life? Like there was always something more to buy or to achieve in order for you to feel like you had “made it”?In this book, I share how my heart changed and I began to find real, lasting peace, abundance, and joy through focusing on what matters most and disregarding the rest.

    Find out more here.

  • ConvertKit Form

    Five Days to Freedom: Tips for Choosing Less Stuff and More Adventure in your Daily Life

    Five lessons with practical tips and exercises to help you feel more in control of your life!

    Success!

    There was an error submitting your subscription. Please try again.

    We won't send you spam. Unsubscribe at any time. Powered by ConvertKit
  • Recent on Instagram

    livefreemiranda

    Packing up for our 15th anniversary getaway (Costa Packing up for our 15th anniversary getaway (Costa Rica ☀️🌺🌴🥰) and grateful for this past month of relationship-focus. 

All of October the #livefreecreativepodcast episodes centered on ideas for a more intentional, connective marriage, in partnership with our fave all-natural intimate body oil @coconu 🥥 (watch my story highlight for more info!)

As I taught and implemented some simple tips, I noticed a measurable difference in my own partnership with Dave, and we’re so excited to continue building on that with this next week away together. 

Some of my favorite takeaways from the episodes are these: 

• Take care of yourself so you can take care of your relationship! (Ep 155)
• “Foreplay is everything that happens in between sexual encounters.” -@kristinbhodson (Ep 156)
• Have more fun simply playing together! (Ep 157)
• Learning to love one another is an ongoing process. (Ep 158)

The biggest takeaway is that great, loving, balanced marriages don’t happen on autopilot. They require an investment of intentional time, emotional energy, and commitment and can be so worth the effort!

Use LIVEFREE for 15% off your order of @coconu (it’s a perfect sexy stocking stuffer 🎁😉) and tune into the show for all of these tips and more.
    Slip-sliding into the holiday season this weekend. Slip-sliding into the holiday season this weekend. 🎃🦃🎁
Here’s a quick reminder that the most meaningful gifts of the year might not be under the tree (or on a cargo ship in the ocean. 😜🚢)

#lessstuffmoreadventure
    How well do you know your partner, TODAY? Do you How well do you know your partner, TODAY? 

Do you know their current stressors? Dreams? What they love to spend time doing and what they wish they could set down?

The Gottman Institute has found that one of the foundations of a solid, long-lasting relationship is what they call “marital friendship”. 

Marital friendship looks like getting to know your partner and then CONTINUING to get to know each other as life changes, circumstances shift, and your own core identities and understandings progress. 

This week on the #livefreecreativepodcast I share some ideas for building and updating your personal “Love Map” and even include a free, printable PDF to get the conversation started! 

Tune in on your favorite listening app. 💕
    Hi there! It’s been a little while since I intro Hi there! It’s been a little while since I introduced myself and thought I’d take a minute to share: 

1. I’m an RN patient educator turned online educator and intentional living specialist. I’m applying right now for a Master’s Degree program in Applied Positive Psychology, and look forward to adding new research and understanding to what I share in my podcast, online courses, and retreats! (🤞 I get in!)

2. I have been married 15 years, have 3 kids, 2 cats, 6 chickens, 1 dog, and love the mild chaos of our small and quite full house, #ourrichmondfixerupper.

3. I teach and share principles for wellbeing and living life on purpose in four main ways: 
• my free weekly podcast #livefreecreativepodcast
• one-on-one monthly creative mentorship
• 2x annual group online masterclass, opening again in January 2022
• small group work retreats #livefreecreativecamp and #lfcgrownupsummercamp, 2022 dates coming soon

4. I’m the author of More Than Enough, a non-fiction book about the lessons I learned during a year of not shopping. The experience and book were pivotal in my relationship to stuff and to myself.

5. I love reading, nature, tacos, running, diy projects, kitchen dance parties, loaded French fries, traveling, sleeping, teaching, making lists, trying new things, and the feeling I get when I still my thoughts for long enough to settle into the wholeness of the present moment.

6. I’ve been sharing online for over 14 years (first blogging, then Instagram…) and sometimes feel more disconnected because of the perpetual nature of these platforms. I crave the true connections we can make as humans in the real world and love using IG as a jumping off point to meet and gather, teach and learn with women in other, longer-lasting ways. 

7. I’m an Aquarius , enneagram 7, Generator, and a nuanced, unorthodox Mormon who truly believes we are all meant to walk our own pathways in this life, discovering our truest selves and finding alignment with her wholeness. ✨

Okay, that’s enough about me. Did you learn something new? 

Now, tell me something about you!! 

(Headshot by @heathermildenstein at Fall 2021 #livefreecreativecamp)
    Spending the weekend in a little corner of heaven Spending the weekend in a little corner of heaven called Idaho. 💛

I read a great article last week about how experiencing “moments of awe” and creating space to feel all of the perspective that feeling brings, can increase our overall wellbeing. 

Just stepping outside here feels like entering a wonderland— add in having fun with good friends (redesigning and styling @3in30podcast main floor ✨) and I feel pretty great. 

How will you take a moment to feel awed today? A walk outside? A quiet corner with a good book? Delighting in a lovely bite of delicious food? Remembering how lovely life can be invited even more of that loveliness into our experience.
    How much effort and intention do you put into your How much effort and intention do you put into your marriage every day? Week? Month? 

Did you know that some super simple (fun and easy) practices can keep your relationship running smoothly and help reduce the uncomfortable friction that comes when we work against— rather than in alignment with— our partner. 

Tune in to episode 157 of the #livefreecreativepodcast to hear more about these 5 practices! 

Which one jumps out to you as something you could implement easily today?
    Simple, beautiful, functional storage for the win! Simple, beautiful, functional storage for the win! ✨

In our little home (1400 sq ft) I am always on the lookout for forgotten spaces we could maximize with easy and affordable design solutions.

This over-the-keyboard nook is a perfect example of a little-used wall that transformed into an efficient family command center with about $150 of shelving supplies and 2 hours of effort.

 As soon as I finished I thought “Why on earth hadn’t I done that earlier! It’s MEANT to be like this!” 

Sending you a bit of confidence and creativity to use your own home to its fullest most meaningful potential! ✌️

#ourrichmondfixerupper
    “As long as you’re dancing, you can break the “As long as you’re dancing, you can break the rules. 

Sometimes breaking the rules is just extending the rules.

Sometimes there are no rules.”

— Three Things To Remember, Mary Oliver ✨

This whole week of #livefreecreativecamp was a gift— stepping outside of the passing of time to pause, reflect, gather, and connect.

Sometimes, even over a dozen years into this hobby-turned-business-turned-career, I wonder what I am even doing. If I’m doing it right or well. 

And then I remember: we’re all just sort of making it up as we go and doing the best we can with what we have. 

Dancing along to the beat of our own heart, and hopefully spreading joy along the way. 💛
    It’s impossible to put the experience of Creativ It’s impossible to put the experience of Creative Camp adequately into words. One part incredible community of supportive women meets one part deep solo work time, mixed with a beautiful location, thoughtful meals, inspired masterminds, and the kind of synergy that fills your heart to the brim. 💛

I am honored by the women who chose to step into the space I create for them, and fill it with such generosity and love.

I’m headed home with an added dose of gratitude, confidence, and friendship in my pocket. (Plus a solid first draft on an exciting new essay.✌️)

#livefreecreativecamp

Beautiful photos by @heathermildenstein
    In this week’s podcast, I sat down for a chat wi In this week’s podcast, I sat down for a chat with my friend and sex therapist @kristinbhodson to answer some community questions about sex. 💛

Our chat feels like and approachable, candid conversation with a friend, and I hope you’ll tune in and learn a little something new to increase the connection, desire, and pleasure in your own most intimate relationship.

For most of my own childhood I thought “sex” was a swear word 😂 so needless do say, there has been lots of learning, growing up, developing myself not only so my own personal relationship flourishes. Also because I know as I model a healthy, whole understanding of sex, my kids will grow up with so much more of that perspective. 

Tune in, save, share, and let me know your favorite takeaways! ☺️

#livefreecreativepodcast
    Last week we hosted our first annual #Coopstock ba Last week we hosted our first annual #Coopstock backyard bash! 🐓🎉

Celebrating our cute backyard chickens as a #HenUpOrganicsPartner was a great excuse to bring family, friends, and neighbors together to eat, chat, and enjoy live music (isn’t Luna amazing?🎶). 

I wanted a backyard flock for years before we finally made it happen, and these past three years have been a dream come true. We love taking care of our girls and @henuporganics ingredient list reads like our own grocery list: ancient grains, fruits, and vegetables. 💛

The whole night was magical, and I’m already looking forward to next year. 

Follow along to learn more about Hen Up® Organic Chicken Food by visiting https://clvr.li/HenUpCoopstock (also linked in my IG story and profile!)
    Four years ago, during our first fall living in Vi Four years ago, during our first fall living in Virginia, I rented a convertible for a day to take the kids on a leaf peeping drive through Shenandoah National Park. 🍂🍁😍

Tonight I finally spent 30 minutes compiling the video I took that day into a short montage, and remembered the fun and whimsy of that little adventure. (The kids have grown so much!! ❤️) 

I think it’s time for a repeat this year! ✌️

#lessstuffmoreadventure
    Follow @livefreemiranda on Instagram
    This error message is only visible to WordPress admins
  • FAVORITE CATEGORIES

    • DIY
    • SEW
    • DECORATE
    • EAT
    • LIFE
    • TRAVEL


© Copyright 2021 Live Free Creative Co | View our Privacy Policy