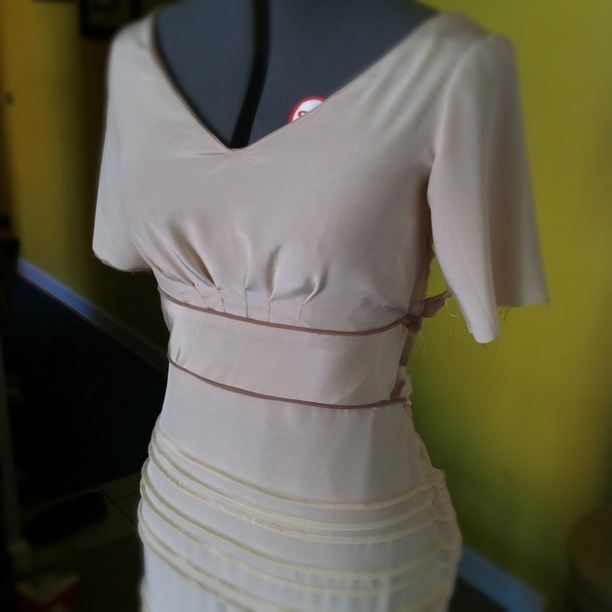
Okay, so now we’ve designed and sketched, and created a pattern on the dress form. Next it’s time to take that pattern and turn it into a real dress by cutting out the pattern pieces in silk de chine and rayon lining, piecing the dress ( which is basically basting all of the major seams together), and then trying it on the bride herself.
From this point on, everything is relatively straight forward. Once there is a pattern to work with, we begin with the steps you might learn in sewing 101. Lay the pattern pieces on the fabric (shown here on red cotton, so they show up) and make sure all major construction pieces are lined up with the grain of the material as it rolls off the bolt. You can try to lay them out helter skelter on there to maximize fabric (which I totally do when using cheap knits and so forth), but might get some funky pulling once the thing is put together.
For this dress, I cut both front and back bodice, and front and back waistband pattern pieces on the fold. Even though I had a full piece from the draping, I wanted to ensure a uniform mirror image. Also, for this dress, I double lined the bodice piece, meaning that I first basted the thin silk de chine on the bodice to a single layer of rayon lining, making it doubly thick. Then I proceeded with the real lining as usual. The skirt is a single lining, because it would have been a nightmare trying to evenly line up two layers of fabric for those pin tucks. One other note, I made the beige piping by cutting 1″ strips of the beige silk on the bias, then using my zipper foot to sew the strip tightly in half around a piping cord. There is a great tutorial for making piping here.
Bada bing, bada boom. The sketch starts to come to life!
I spent about 8-10 hours cutting and sewing the dress to this point from the pattern. Even though it looks almost finished here, every single seam at this stage has only been basted…not even backstitched! So, if left as is, would basically all fall apart at a slight breeze. The value of the piecing, however, is being able to change any seam very easily, and since Katie had not yet tried the dress on, I wanted to have a lot of wiggle room.
The pin tucks and darts were sewn officially, however, and they are such fun details! I also love how well the beige works with the cream for a really classic neutral look.
And it was this side here above, where the zipper was not yet placed, where the curious incident of the finger and the zipper took place. Hilarious.
It worked out quite well that we had planned a last-minute trip to Utah for the beginning of August. That way Katie had a chance to drive down from Idaho for a couple dress fittings. At the first one, I held my breath as she pulled the dress over her head. Once we figured out where all of the yet-unstitched lining should go, it fit like a dream. Seriously, not a major adjustment in the place! I took about 0.5″ from the inside of each shoulder seam to bring the neckline a little closer to her chest, and then pinned where the zipper should sit, and that was it! We also looked at the knotted waist tie that I had made and decided it worked well with the look, so I needed to stitch that in place.
Once the zipper was sewn in, she came back for a final fitting, and we noticed the pin tucks slanted ever so slightly towards it. So, at home I made a couple adjustments to line them back up straight. But it was incredible to be able to trust the accuracy of her measurements and my dress form. I’ll be less apprehensive in the future to complete a long-distance dress that doesn’t allow for a fitting.
I packed the dress back to Virginia and got ready to begin completing it by re-sewing all of the seams with finishing stitches and the serger. I also needed to hand-sew all of the bodice lining in place, add the knot tie, and add the lace to the sleeves and hem. The next and final installment of the series will be: finishing details.


