Hello there! I’m back with another few wedding dress photos for you. It’s been fun to hear from a few people (in person) that you’ve enjoyed the insider scoop on this project. I appreciate hearing your feedback. It’s sometimes like radio silence out there without your comments. Makes me uneasy:)
So, I mentioned that this would be the last post in the series, but that was untrue. I would love to post some photos from Katie’s bridals, or the actual wedding day, with her permissions, of course. So, it will be a few weeks, but sit tight for those, which will be the icing on the cake!
Okay, to recap: we did design and sketch, pattern making, cutting, piecing and fitting, and now we are to the REALLY fun (though sometimes the longest) part: finishing the details.
I mentioned that at the fitting, we decided two things. First, that the pin tucks slanted ever so slightly towards the zipper seam, so that needed to be corrected. Second, that we loved the knot on the waistband, so that needed to be added. I studied and explored the construction of the dress a little to troubleshoot the slanting pin tucks, and finally concluded that to straighten the pin tucks, I needed to deconstruct a little. I basically detached the skirt from about the center line in front and back to the zipper, then realigned it, which removed about 1/2 inch from the top of the skirt on one side. Does anyone follow? No? Well. It worked:) Once put back together, I had straight tucks and I still had smooth hips. Great.
I added the waistband with the knot with teeny tiny hand stitches. Long process, but I like that the stitches are almost imperceptible that way. This knot is one of my favorite details. I’m very happy with how the rounded edges and contrast beige piping turned out.
Before stitching on the lace finishes, I made the double wide trim. I created 0.5″ single fold bias tape and sewed the lace on either side. Then it was ready to add to the sleeves and hem. I bought this lace on Etsy before buying the silk de chine, so they are an exact color match!
You’ll notice these photos are all slightly yellow? That’s partly due to cool instagram filters, and also because the only light available while I worked on this baby was my pendant lamp and hallway lights. Because it was always late. And that is totally off subject.
Anyway, once the zipper was back in and the skirt was raised slightly, the dress was too small to comfortably pull over the fixed shoulders of my dress form. So I tried it on myself to send a text to the bride. Dave thought it was hilarious that I wanted him to try to actually zip it up. He said “I don’t want to get a blister from this zipper!!” It was not happening on this two-months-postpartum bod. Doesn’t make me feel too bad, though since it wouldn’t happen anyway, with my lowbust (ribcage) a full 2″ wider than cute Katie’s. Fun to feel the swish of a silk skirt for a second, though:)
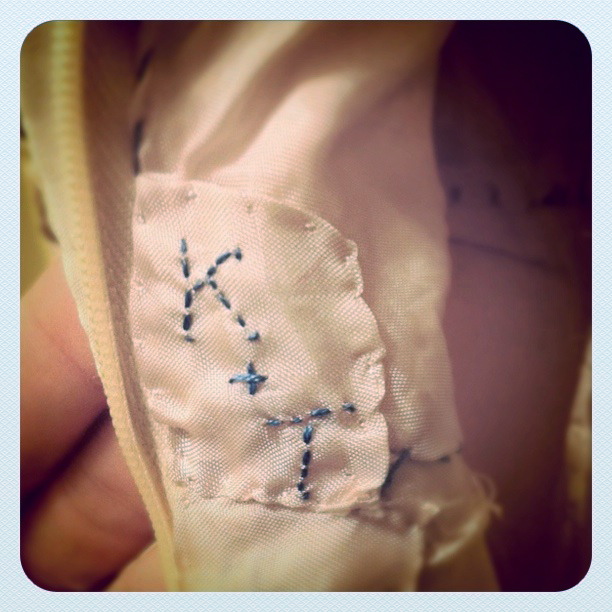
Along with adding the waistband and lace, I also finished up the interior of the dress by hand-stitching the lining down. It’s an arduous task for which a couple episodes of Bachelor Pad 2 are perfect! I stitched some of the lining with a little “something blue” thread and finished it up with a little handmade detail. “K+T” at the waistband on the inside of the zipper. Why buy handmade if you can’t enjoy the personal touches:)
Is it weird that one of my favorite details is the hem of the skirt lining? Something that will never be seen?
I scalloped it.
How cute is that?
Then, last night, with the dress finished, Dave turned on “How Do You Know” (eh, it was okay), and so I snuggled up next to him and worked on Katie’s hair accessories. She had mentioned she would forgo a veil and choose a headband or flower hair pins instead. So I made both using silk scraps from her dress. I love this bow headband, but it is so over-the-top. I toned down the idea and went with a simple flat bow. Katie had texted me a flower that she liked, so I made a couple in the same vein of style and attached them to bobby pins.
Then I got all crazy with the hand lettering.
I want to learn calligraphy (if I were in Utah, I’d so be at this class!), and figure I should get started practicing on something. This paper I made (at a member’s only workshop) seemed the perfect backdrop for the hairpieces and some fancy doodles!
Well, that just about does it! With the dress folded neatly, and the hair-pieces tucked on top, this project is nearing it’s end!
I wrapped it up in white, then blue, tied it with string, and added a flower as a final detail.
It’s off in the mail destined for a memorable day in Idaho when two special lives will become sealed together for the long run! Whoo hoo!
What do you think? Did you choose a more traditional wedding dress? Would you change it if you were getting married now? I loved my dress (which I just realized I’ve never posted a real photo of…), but I am sure it would be different if I was choosing it all over again today.


