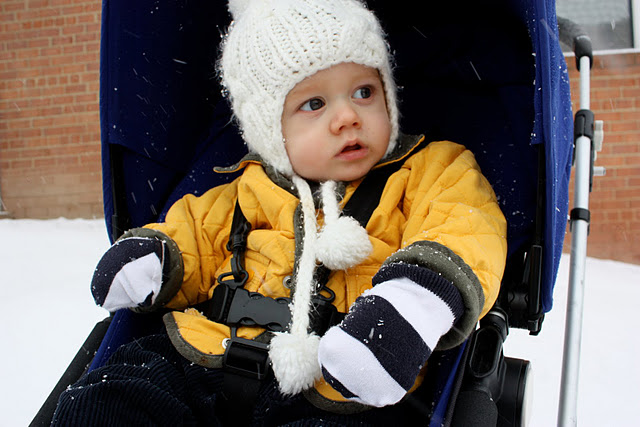
Yesterday, Mr. Milo I went wandering on King Street in Old Town Alexandria with a new friend and her little boy. Both babies were burrito-ed in their strollers, quilts wrapped around them like tortillas from toes to chin, just little eyes peeping out from beneath their hoods. We would’ve let their hands free-except that neither of us had gloves for them, and their little fingers would have frozen! Turns out I spoke too soon about the winter. It’s here still. We stopped in at Pink & Brown and the shearling-lined gloves were darling…and $35.00! So, when I got home, I set out to make Milo a pair of simple, warm mittens. I recycled an old (bought at a yard sale) sweater into the cute striped outer layer, and lined them with warm polar fleece. I call them the Old Town Stroller Gloves. Creative, huh? They turned out perfectly.
If you’d like to make a pair, here’s the step-by-step (just click on the photos to enlarge):
You’ll need:
*a pattern of a simple arch with a base of 3″ and a height of 4.5″
Email me for the PDF if you need a copy of mine.
*an old sweater with a little stretch
* at least 12″x 5″ polar fleece
* 9″ of 1/4″ elastic
1. Grab an old sweater with some stretch and fold it over along the waistline (this way you can use the finished edge of the sweater as the trim on the mitten. If you don’t have a finished edge, that’s okay, too). Place your pattern on the fold and cut 2 (see figure 4 to see unfolded)
2. Fold your fleece in half, then half again and place the cut around the pattern on the fold. **IT IS VERY IMPORTANT that the fleece STRETCHES HORIZONTALLY along the FLAT END (WRIST), NOT VERTICALLY up to the curved end.
3. See the fold? Just begin cutting at the beginning of the arch.
4.This is what your pieces should look like. You should have 2 of sweater and 2 of fleece.
5. Cut two pieces of elastic to 4.5″. The elastic will be on the inside of the two-layered gloves and help keep them on little hands without making the outside look bunchy or gathered.
6. Next we’re going to stitch the elastic to the fleece using a narrow zig zag stitch. OKAY, this part is a little tricky. Pay attention! Pin the elastic about 1″ from the flat end of the glove in three places: on each edge and in the middle (look at that photo!). You’ll notice that the elastic is shorter than the fleece by about 1.5″. In order to stitch the elastic correctly, you will want to pull it flat along the fleece. Starting out it is helpful to hold the fabric behind the presser foot to counter your stretching the elastic towards yourself. Get it? If you try to stretch the elastic out along the fleece and you’re not holding on behind the foot, you will pull the fabric out from under the foot. See photo 7 for the end goal here!
7. This is what the pieces should look like after the elastic is stitched on.
8. If you are using a finished edge on the sweater: lay one sweater piece and one fleece piece right-side down on the table with the flat ends together. Allow 1/4″ overlap of fleece onto the sweater (can you see that little blue edge under the fleece?) and pin. You will stitch this with a wide zig-zag stitch. (if you are not using a finished edge on the sweater, simply put right sides together and stitch along the wrist line.)
9. This is what your pieces should look like.
With me so far? Good, let’s move on:
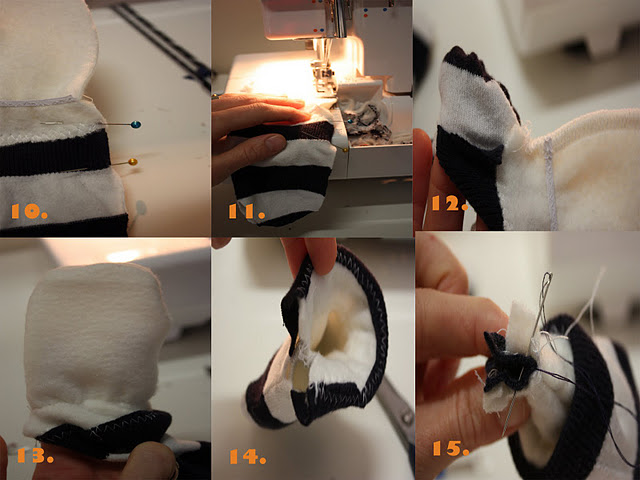
10. Fold your glove lengthwise, right sides together. Pin about 1″ at the base of the sweater fabric. This will be left open to be able to turn the glove right side out.
11. Stitch (sew or serge) around the edge of the fleece. Then stitch around the edge of the sweater, until you hit your pin. You should be sewing on the WRONG side of the fabric.
12. Start turning the glove right side out through the hole you left on the wrist line of the sweater.
13. Keep turning, pulling all of the sweater, and the fleece right side out.
14. When you tuck the fleece into the sweater, you’ve finally got something resembling a mitten!! The wrong sides of both fabrics are hidden inside the glove, and there will be no snaggy seams to get caught on little baby fingers!
15. Fold the glove so you’ve got the raw ends of the sweater together. Whip stitch by hand to close off the sweater.
How’s it coming? Good. You’re almost there!
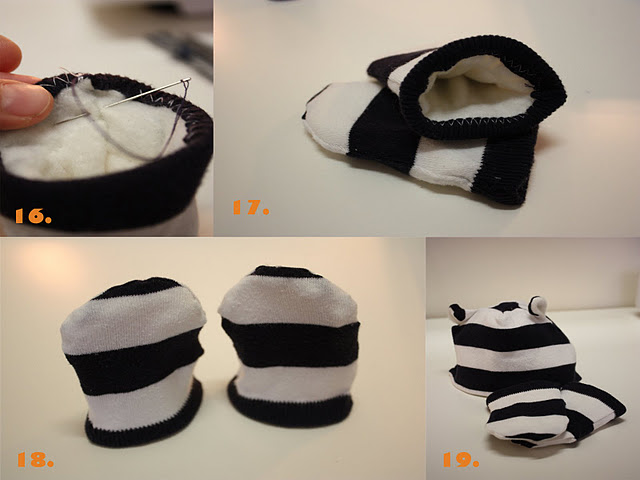
16. If needed, hand stitch the final little opening in the fleece.
17. Once again, tuck the fleece all the way in, snip any stray threads and HORRAY! You’re done!
18. Seriously. So cute.
19. Yes, that is a little eared Old Town Stroller Beanie to match. Watch for the Beanie tutorial coming soon!!
If you have questions, be sure to post a comment and let me know! I’ll try to clear them up.
Here’s to warm fingers this winter!!


