 I love Halloween costumes! For years I’ve made custom costumes for my kids and for customers all over the country, and this year decided to keep it simple and just make costumes for my kids. Then the boys spotted costumes they wanted at Costco, and rather than force them into the family theme I had chosen (Wizard of Oz!), I let them be the Fireman and SWAT police officers that they wanted to be.
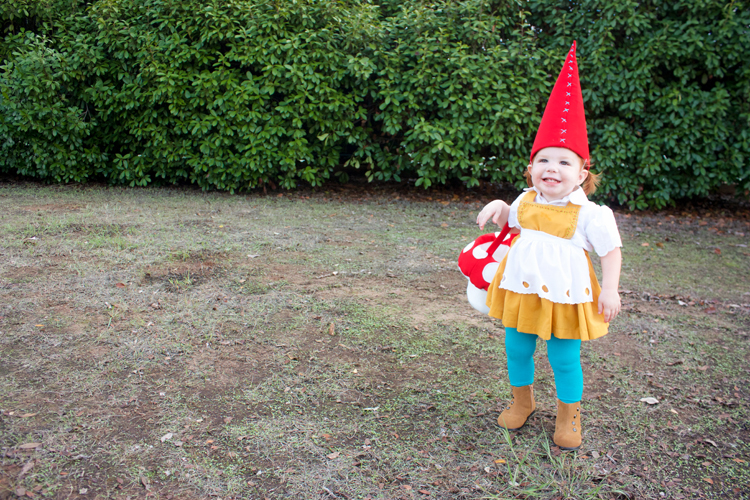
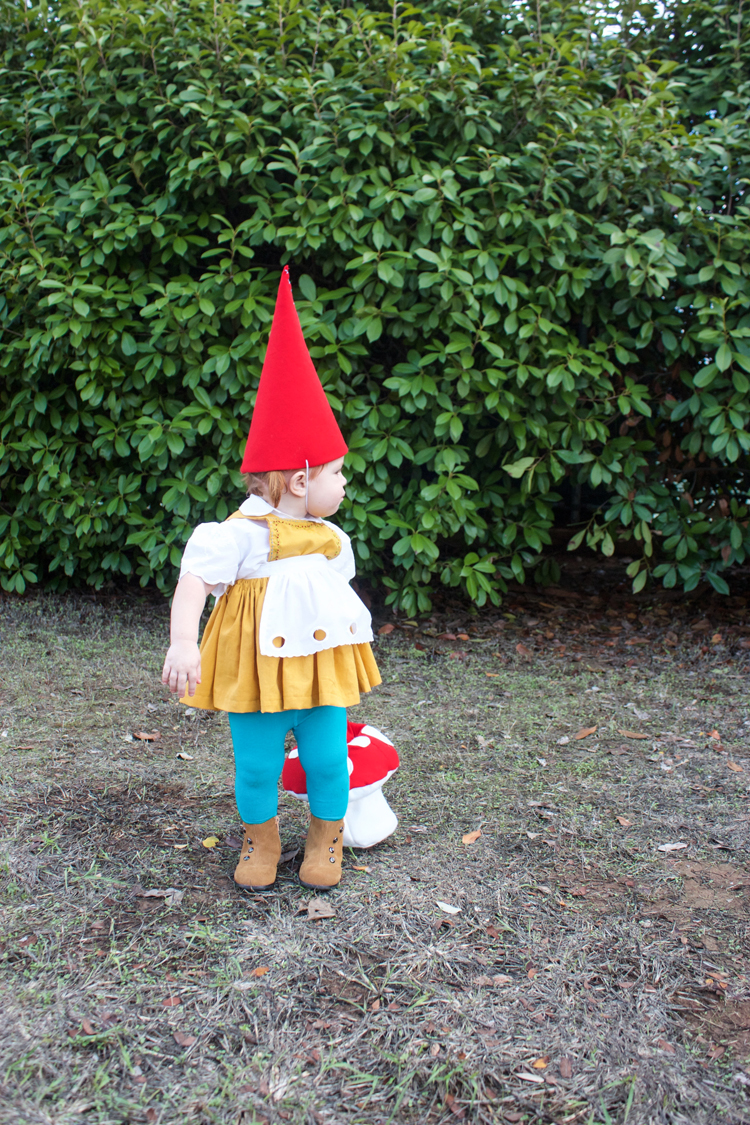
That left Plum in need of a costume, and after thinking for some time, a friend suggested she be a gnome. Immediately that fit! Her red hair, chubby cheeks, mischievous eyes, and contagious smile were made for being a little gnome. Not to mention how much fun creating a DIY Garden Gnome Costume sounded!

 I’m over the moon for how this little costume came together. I’m excited to tell you more about it, and share illustrated tutorials for all of the main pieces!
I started with the white button up shirt with peter pan collar. The bookworm button up pattern that I had used for this Stylo shoot was great, and the only modification I used was to round out the collar corners. I used some vintage lace that my mom gave me years ago, and used the scalloped edge of the fabric for the sleeve hems, which made a beautiful detail.
The little apron was made with another piece of vintage lace, and I used the same method, leaving the eyelet edge as the hem for the design.
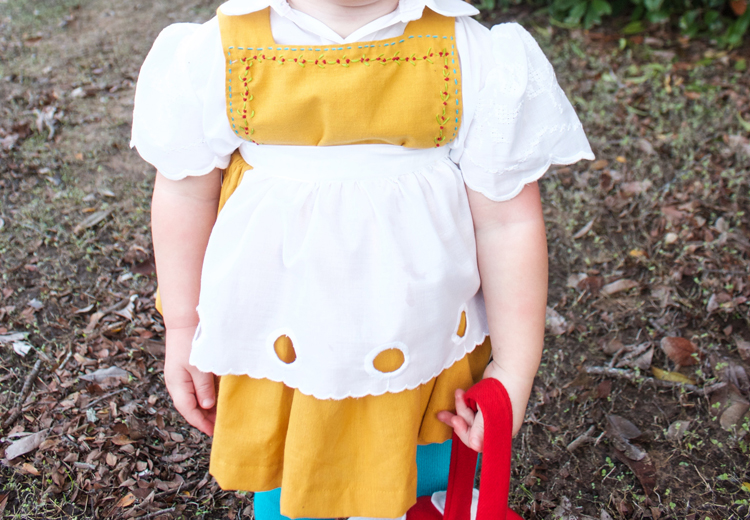 I bought this gorgeous mustard linen with a gathered skirt for Plum in mind, so I decided to include that as a piece of the costume. Rather than making a traditional pinafore, I made a full gathered skirt, then added a detachable pinafore piece that buttons on inside the skirt waistband. That way she can wear the skirt with or without the pinafore piece, which makes it a lot more versatile.
Because I was only sewing one costume, I went all out and enjoyed the details, like hand-embroidering the bodice. I love the way it turned out!
 I ordered these teal knit tights from June and January (along with a few other fun colors!) and the leather boots from Fox Paw Shoes (who is offering a 30% discount right now with the code MIRANDA30!!)
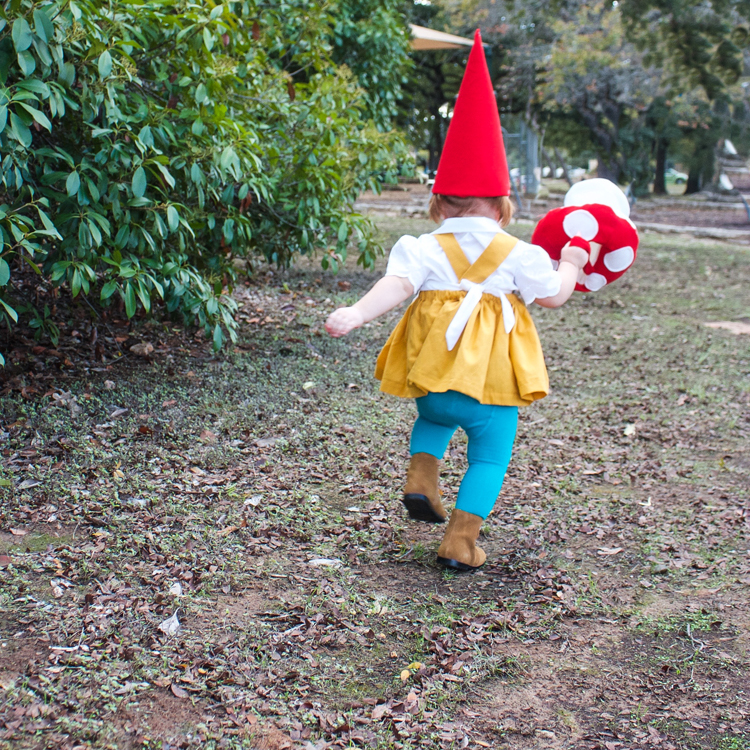
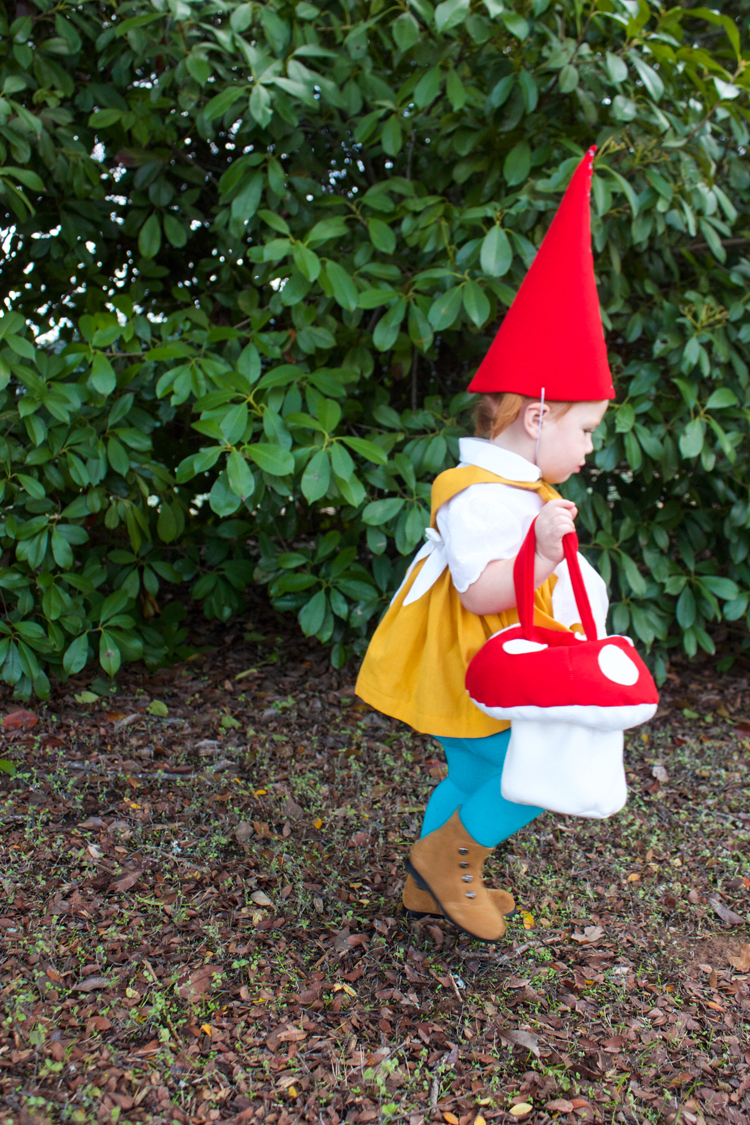
Then the final details were her gnome hat and toadstool bag, which totally MADE the costume. Without them she could be any number of really cute storybook characters, but with them she is definitely a garden gnome.
 Are you ready for a little DIY Garden Gnome Costume tutorial? I didn’t take pictures along the way, and all of the pieces of the costume are fairly simple, so I’ve illustrated the steps below. For the skirt and pinafore you’ll need:
1 yard of fabric (more or less depending on size)
1 yard of 3/4″ elastic
4 buttons
embroidery floss + needle for hand stitching, if desired.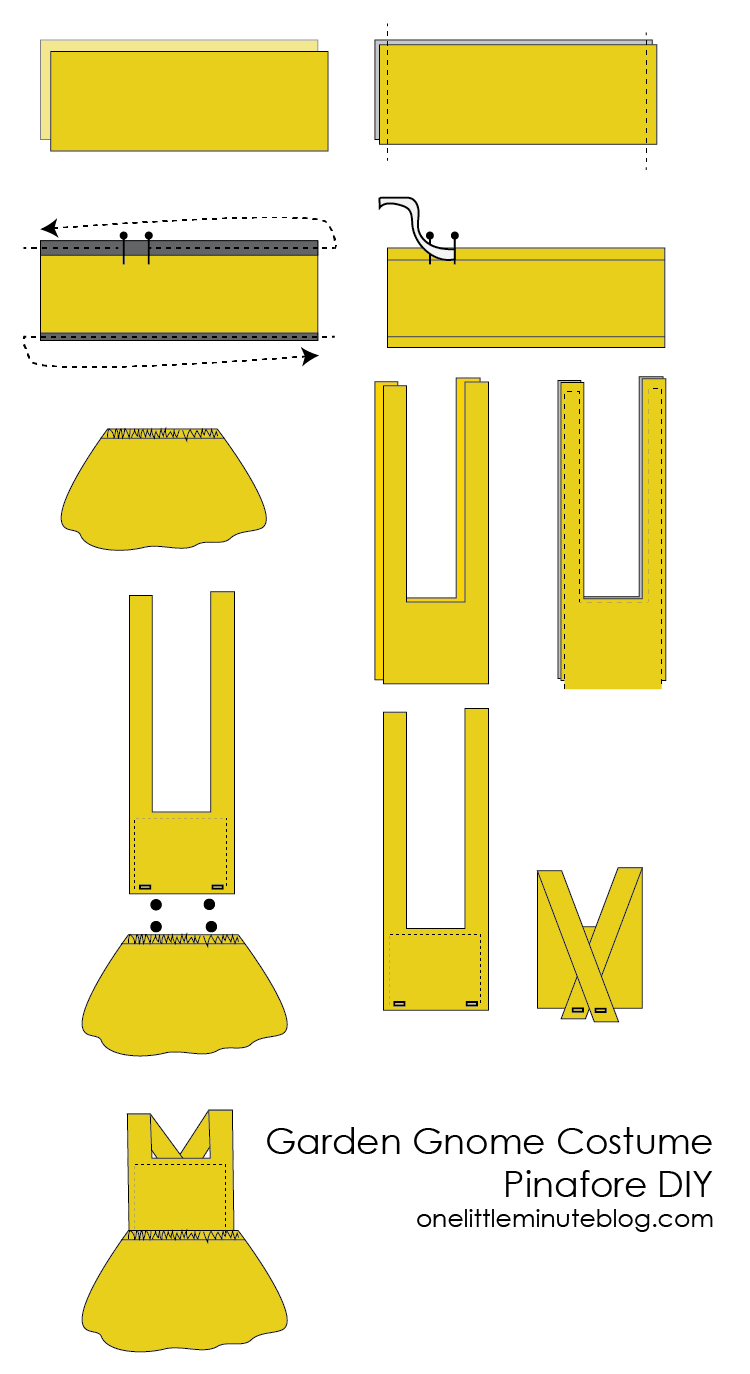 Determine the size of skirt you’ll need by measuring the waist circumference. Take that number and triple it, then divide in half. That will give you the length of the skirt pieces, front and back, that you want. For example. Plum has a 21″ waist, so 21×3=63/2=31.5″ Her two skirt pieces were roughly 31″ long each. For length, measure from the belly button to above the knee, then add 2.5″ for the waistband and hem. Plum’s length was 10″ so 12.5″ starting height.
Cut two pieces of fabric to your measurements and place right sides together. Stitch along both sides with a 1/5″ seam allowance.
Fold the top edge down 1/4″ then 1″ and press. Place 2 pins in the fabric about 2″ apart to remind you to leave that open for the elastic threading. On the hem, fold 1/4″ then 1/2″ and press. Stitch along both edges, leaving the casing hole open on the waistband, and finishing the whole hem.
Cut a piece of elastic to the waist measurement. Thread it through the waistband casing and overlap 1″ then stitch the elastic together. Stitch the waistband closed. Now you’ve got a finished skirt!
To make the pinafore, use 1/2 of you waist measurement (for Plum this would be 21/2=10.5″) and measure from the belly button to the collar bone for the height (Plums was 6″). You’ll want straps at least 15″ to start (longer for an older child) and will cut them down later if needed.
Use the measurements to create a pinafore piece as shown. Cut two, then place them right sides together and stitch around the edges 1/2″ seam allowance. Cut the corners, being careful not to cut any stitching, and turn right side out. Press flat. If you want to add decorative embroidery, do that now stitching through only one layer of the fabric. Fold the raw edges under 1/2″ and press, then stitch closed.
Add button holes to the bottom edge of the pinafore piece, about 1/2″ from the corners. Then line up the piece inside the skirt and add the buttons at the appropriate spots.
At this point, try the skirt+pinafore on the child and place the straps over the shoulders and cross behind the back. Mark where the straps will comfortably attach to the skirt. Add button holes at that point on the straps, and buttons on the back inside waistband of the skirt.
Done!
I didn’t include the illustrated apron DIY, but it’s really simple: Cut a piece of fabric to 1/2 the waist circumference, and 1/2 the full skirt length. Fold and hem on three sides (unless you’re using lace, in which case fold and hem two sides.) Cut a waistband 4″ wide and 2x the waist measurement. fold in half with right sides together and stitch around 3 edges, leaving a hole as wide as the 1/2 waist. Turn right sides out and press. Gather the top edge of the apron skirt to 2/3 it’s original width, then place gathered edge inside the hole of the waist strap. Stitch closed, securing the apron skirt into the band. Tie in a bow in the back!
 Okey Dokey, are you ready for the bag + hat? I literally made the bag up as I went, so forgive me for the steps that might seem confusing! It works out, I promise! The had is much more straight forward, and is the perfect touch.
For the bag you’ll need:
1 yard of white wool felt
1/2 yard of red wool felt
7″ circle of cardboard
a couple handfuls of polyfill
For the hat you’ll need:
1 piece of art foam
1/2 yard of red fabric (I used wool)
1o” of thin elastic
Embroidery floss needle
Glue gun
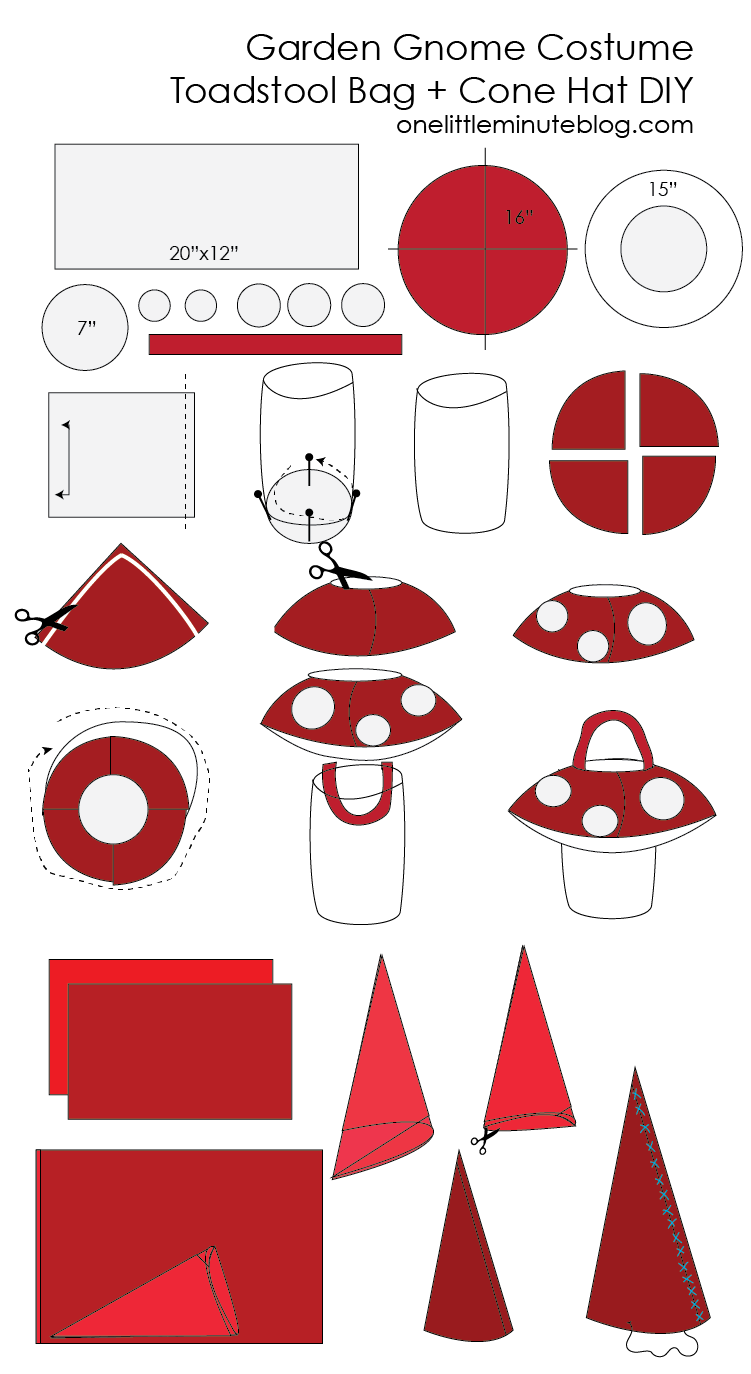 Instructions for the toadstool bag:
Cut the pieces of felt you see above, according to the measurements listed. The small white circles are 2″ and 3″, and the red handle is 4″x 16″.
Fold the rectangle of white felt in half and stitch along the edge, creating a cylinder.
Pin one end of the cylinder to the 7″ circle of white felt in four places, then stitch around the edge. This will become your toadstool base.
Cut the red felt circle into 4 pieces then gently round out the top edges as shown. That roundness will help give the stuffed toadstool it’s shape.
Stitch the four pieces back together, with right sides together, until you’ve formed a semi-round shape. Cut a 7″ hole in the center.
Add the white spots to the outside of the toadstool cap.
Put the right sides together of the toadstool cap and the white circle donut piece. Pin around the edges and stitch together. When you pull it right side out, you should have a semi-round cap with a white base.
Fold the red handle piece in half lengthwise and stitch along one edge. Pull right side out.
Pay attention here: with the toadstool base right sides out (all the stitching inside) pin the raw edges of the handle to the upper edge of the base, with the handle piece down inside the base. Then align the right sides of the toadstool cap top edge with the top raw edge of the INSIDE of the base. The cap will be stuffed down inside the base, too. Stitch along the top edge of the base, sandwiching the handle between the base and cap layers. When you fold the cap out, it should be right side out with the handle up, and the raw edges tucked inside.
Stuff the polyfil in between the cap and the base, then hand stitch the white underside of the cap to the white base. Tuck the 7″ piece of cardboard into the bottom of the bag to keep it’s shape.
Instructions for the gnome hat:
Roll the piece of art foam into a cone, trying it on your child’s head until the bottom edge sits comfortably at their forehead. Hot glue the foam at that place, then trim the edges from the bottom.
To wrap in fabric, fold the edge of your fabric over 1/2″ and press.
Starting at the other side, lay the foam cone down and roll it up in the corner of the fabric until it’s covered. Hot glue along the folded fabric line.
Cut off the excess fabric along the bottom, leaving about 2″ to tuck and glue up inside the hat.
Use embroidery floss to stitch small x’s along the seam for an added detail.
Use a fat craft needle to pull the thin elastic from the inside out, tying a knot inside to keep it in place, then into the other side, making a chin strap.
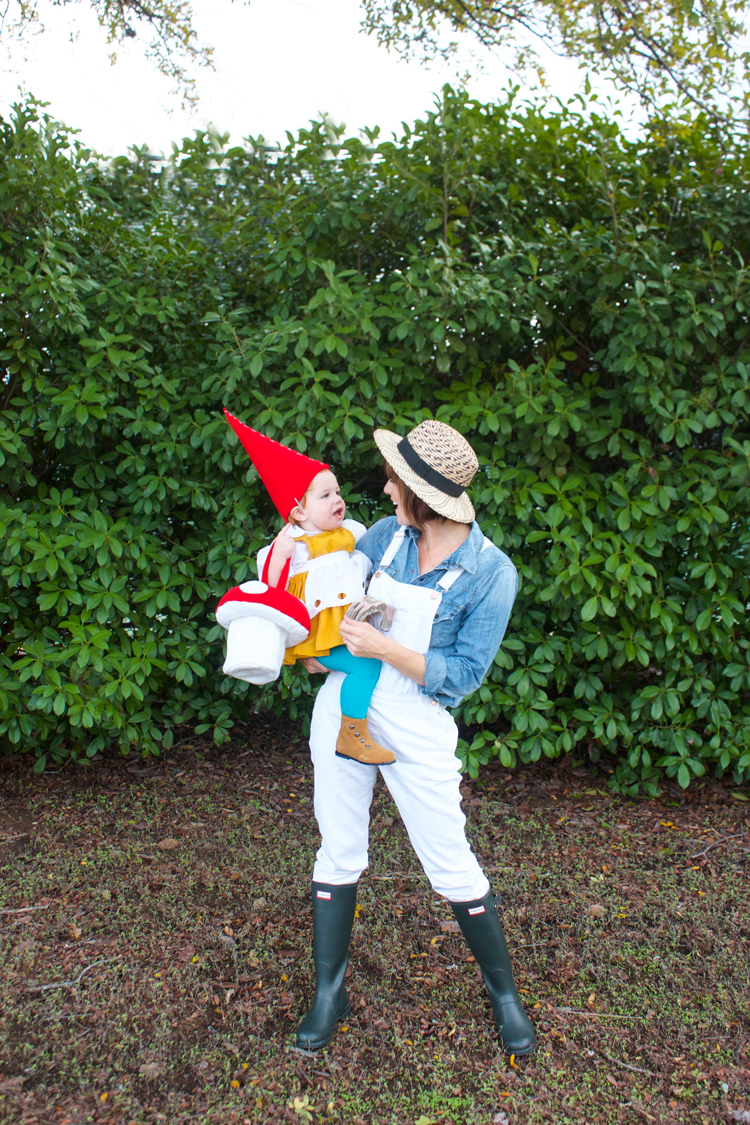 And you’re done! For bonus points, dress yourself up as a gardener and enjoy a mini-themed costume!

