• ABOUT
  • PODCAST
  • BLOG
    • MINIMALISM
    • HOME DESIGN AND RENOVATION
    • DIY
    • SEW
    • EAT
    • TRAVEL
  • BOOK
  • CONTACT
  • SUMMER CAMP
  • CREATIVE CAMP
  • NOVIOS RETREAT
  • <iframe frameborder="0" src="https://playlist.megaphone.fm?p=CTL9280674595&light=true" width="100%" height="482"></iframe>
  • ABOUT
  • PODCAST
  • BLOG
    • MINIMALISM
    • HOME DESIGN AND RENOVATION
    • DIY
    • SEW
    • EAT
    • TRAVEL
  • BOOK
  • CONTACT
  • SUMMER CAMP
  • CREATIVE CAMP
  • NOVIOS RETREAT
Constructing a Knit Tee Shirt // Stretch Yourself
January 9, 2013

This series is sponsored by Baby Lock.  For over 40 years, Baby Lock has been dedicated to the love of sewing by creating machines for sewing, embroidery, quilting and serging – all with ease-of-use, high quality and a touch of elegance.

stretch yourself logo

Constructing a basic tee shirt is one of the foundational skills of sewing with knits. Once you figure out the steps, and feel comfortable with the process, you will open a door to endless possibilities! All different types of blouses, jackets, sweaters, sweatshirts, and dresses are made pretty much this same way. Prepare yourself to create some awesomeness!

I’ll walk you through the basic construction, then head over to learn all about Finishing Techniques for Knit Fabric from Mim!

Basic Knit Tee Constuction - One Little Minute Blog-Favorite tee construction

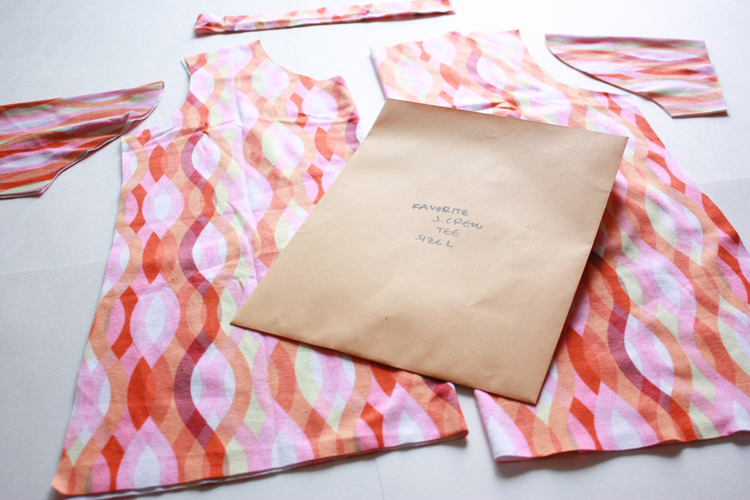
Today we’re going to focus on creating the tee shirt using the pattern that you either rubbed-off of your favorite tee, or drafted using your own measurements. Miriam already taught you all about cutting knit fabrics, and I showed you how to choose the best fabric for your project. If you are re-making a favorite tee, you’ll want to choose a fabric that stretches as close to your original as possible, so the fit is similar. Use your pattern to cut out your pieces, and let’s begin!

You can sew knits effectively using either a sewing machine or a serger. If using a sewing machine you’ll want to invest in some ball point needles. The tips are gently rounded so they stretch between the fibers of the fabric rather than piercing it.

Whether using a sewing machine or serger, it is very important to remember to not stretch the fabric out at all while you sew. If you’ve been sewing with wovens, there’s a chance that you’ve developed a habit of “helping” the fabric through the machine (I know I have from time to time). When sewing with stretchy fabrics, you’ll need to line up the edges, and let the machine feed the fabric through. If you have trouble, try using a walking foot on your sewing machine, or adjusting the differential feed on your serger.

tee construction- one little minute blog- don't stretch as you sew!

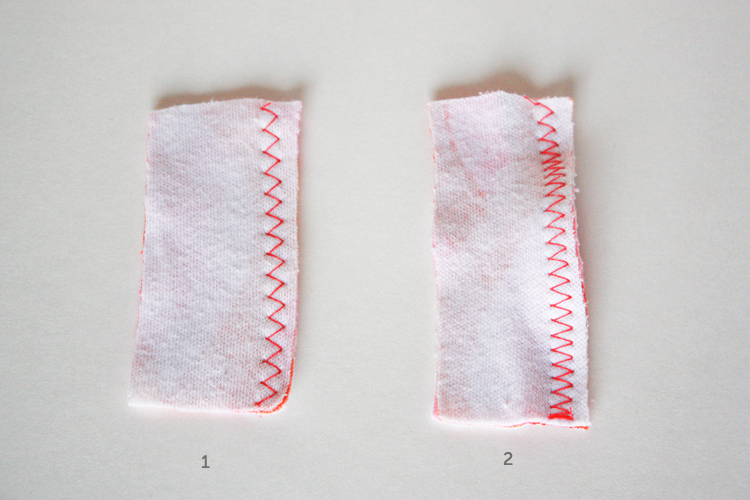
Almost every sewing machine, however simple, will have a zig zag stitch. This is the basic stitch used to sew knits. Because the threads run partially perpendicular to the stretch, rather than parallel to it, they won’t break when pulled. On sample number 1 I let the machine feed the fabric through. It stayed nice and flat. On sample number 2 I stretched the fabric slightly as it fed through the machine. You can see how the stitches hold the fabric stretched out, and create a wavey seam. This isn’t pretty.

basic tee construction-one little minute blog - sewing machine stretch stitches

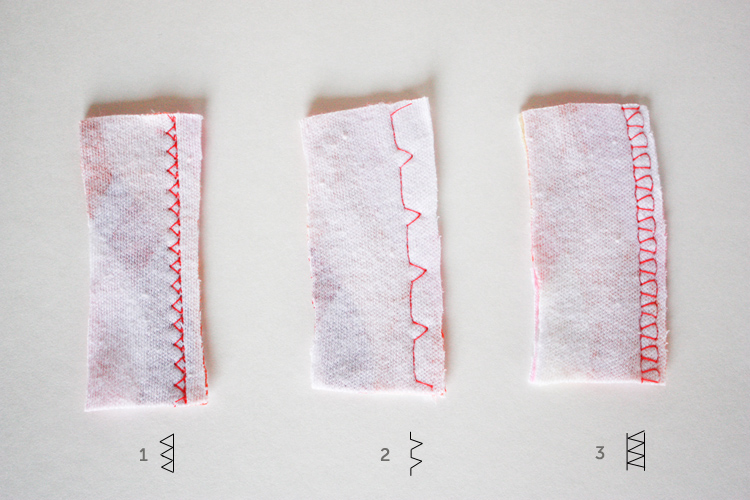
Your sewing machine may offer some additional stretch stitches. The above stitches are a couple my machine offers. To be honest, I only ever use my zig zag stitch when sewing with knits on my machine, but it’s nice to know there are other options. Sample 1 creates a zig zag stitch with an added straight stitch along side. While the zig zag allows the seam to stretch, the straight stitches add strength to the seam. Sample 2 does a similar stitch, but more spread out. The seam sewn with this stitch will stretch, but may look more like a straight stitched seam on the right side of the fabric. Sample number 3 adds a straight stitch to both sides of the zig zag stitch. This seam will have added strength of sample number 1, but the seam will appear even nicer from the right side, because it will appear more like a straight stitch.

Any of these options are great for sewing with knits.

basic tee construction-One Little Minute Blog - serger stitches

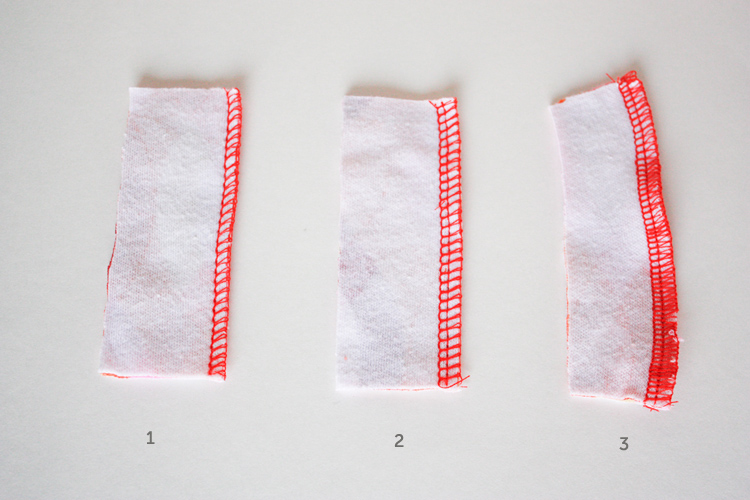
Sewing knits with a serger is incredibly fast and easy. The machine trims the edge of the fabric, then casts threads over the raw edge, finishing it completely. Sample number 1 shows a three-thread overlock (or serger) stitch. This stitch eliminates one spool of thread, which is quick, and for lighter weight fabrics it will work just fine. I prefer to use the four-thread overlock stitch shown in sample number 2. In addition to the overcast threads and stitched seam, the fourth thread adds a second seam of stitches. The seam will be much stronger than the three-thread stitch, and I think the right sides of this seam look neater. Sample number three shows what happened when I stretched the fabric slightly while I was serging it. The same wonky seam as above.

Whichever stitch you choose, remember: don’t stretch your fabric while sewing!!

Okay, let’s get started:

Basic Tee Shirt Construction - One Little Minute Blog - shoulder seams first!

Lay the front and back pattern pieces right sides together and line up the shoulder seams. Shoulder seams are the first thing we’ll stitch.

Basic Tee Construction - One Little Minute Blog - Stabilizing Shoulder Seams

If you want to stabilize the seam, so the shoulders don’t stretch out due to the weight of the sleeves, you can add a strip of knit stabilizer, twill tape, or grosgrain ribbon into the seam by simply laying it on top of your sandwiched fabric and sewing right over it.

Basic Tee Shirt Construction - One Little Minute Blog - sleeves go in second

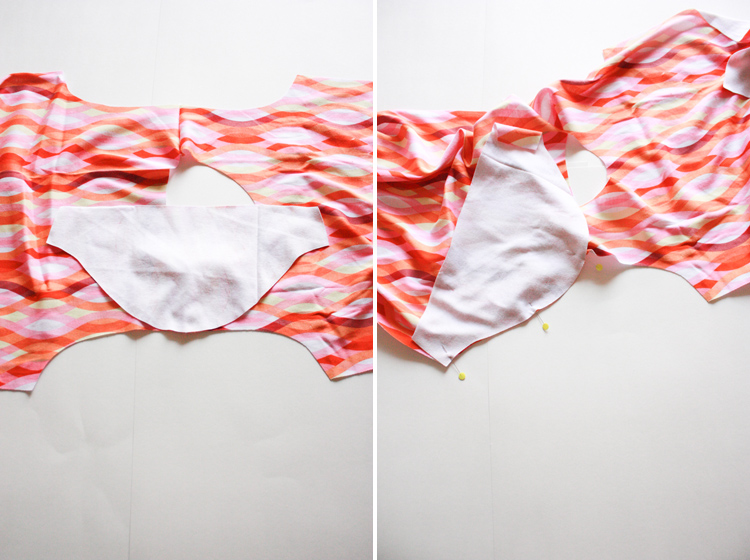
Open up the shoulder seam and press flat. Line the center of your sleeve up with the shoulder seam with right sides together. Line up one edge of the sleeve with the edge of the tee, and pin in place, then add a third pin in the middle of the sleeve cap.

Basic Tee Shirt Construction - One Little Minute Blog - round out the sleeve to get a nice sleeve seam

When the sleeve is lying flat, the edges will not match, because the sleeve cap is round, and the arm scythe is too! You’ll need to lift up the fabric and line the seam up along a curved plane. The seam you sew will still be flat, but you will feed the fabric through in this arched shape to keep the edges aligned.

Basic Tee Shirt Construction - One Little Minute Blog - sleeve cap

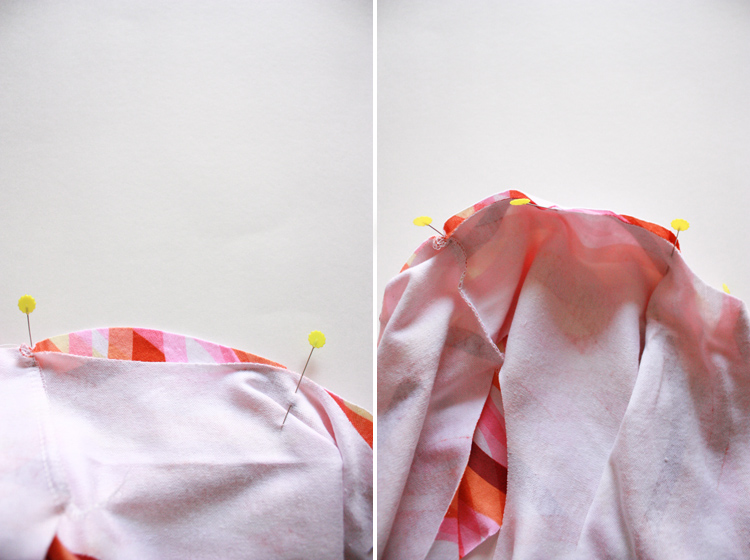
Repeat the pinning on the other half of the sleeve cap, then slowly stitch the sleeve in place.

Basic Tee Shirt Construction - One Little Minute Blog - sleeves second!

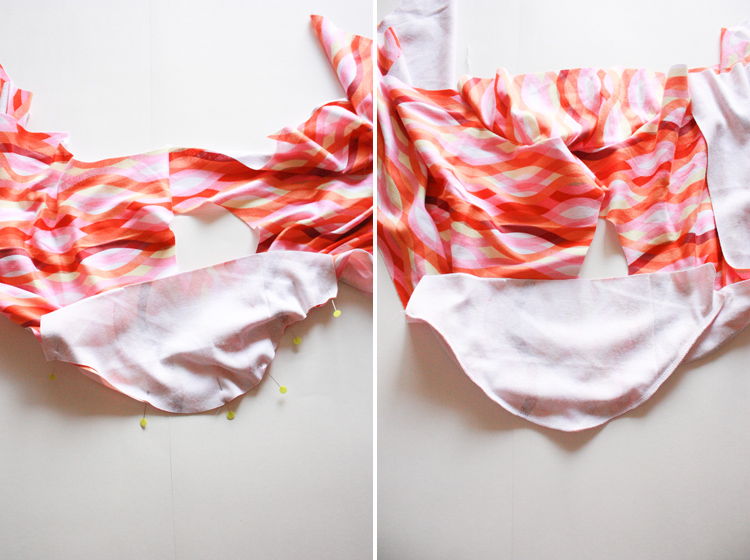
When your tee is right-sides-out, it will begin to look like a real shirt! With right sides together, line up the side seams, from the end of the sleeve, to the underarm, then down along the side. Pin at the underarm, to keep the sleeve seam aligned, then stitch, beginning at the end of the sleeve and ending with the hem of the tee.

Basic Tee Shirt Construction - One Little Minute Blog - neckband

It doesn’t matter when you insert the neck band. Once the shoulder seams are sewn, you can put it in at any point. This time, I inserted it after my side seams were finished, though it may be slightly easier before the side seams are done so that the shirt can still lay flat.

Fold the neckband in half lengthwise with right sides together, and stitch the raw ends. Fold the loop you’ve made in half width wise and press to hold the center fold.

Basic Tee Shirt Construction - One Little Minute Blog - neckband insertion

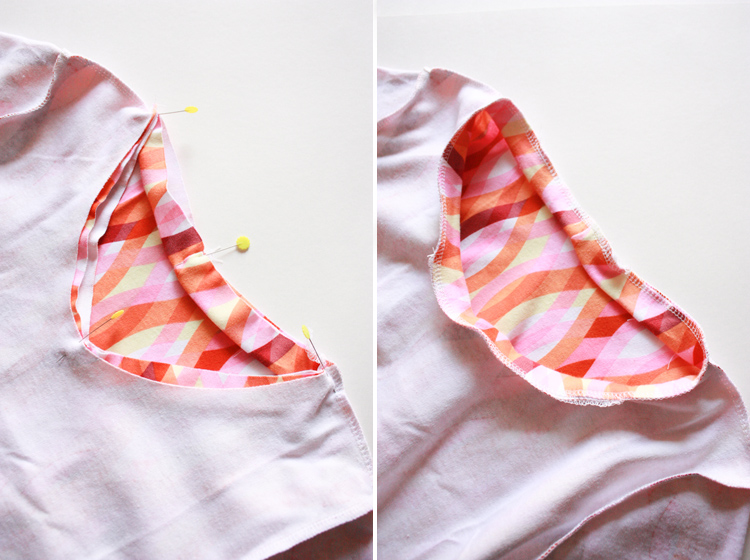
Line the neckband seam up with the center back of the tee and pin in place. Stretch the band in half to find the center front and pin to the center front of the tee. Find the center sides of the band and pin to the shoulder seams. Stitch the band onto the neck opening, stretching just the band (not the neckline of the tee) slightly between the pins so it fits.

Basic Tee Shirt Construction - One Little Minute Blog - Finished Tee!

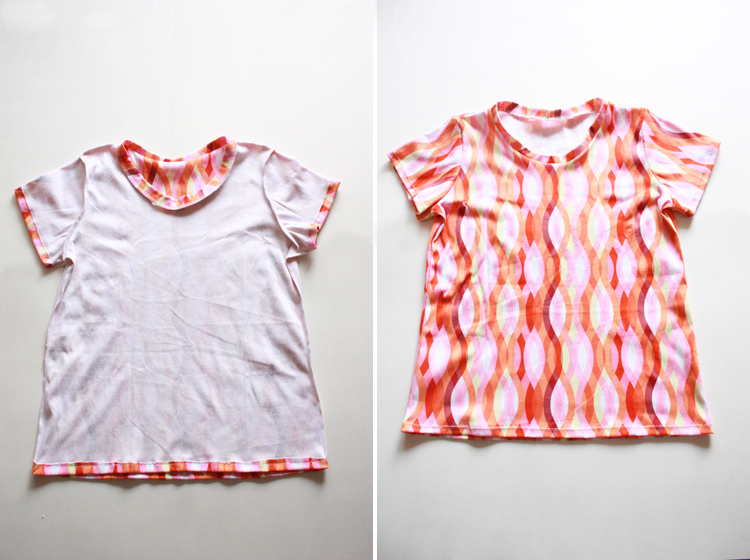
Turn the sleeves and hem under the amount you determined on your pattern, and stitch in place, either with a zig zag stitch on the sewing machine, a double needle on the sewing machine, or with a cover stitch machine. On this tee I used a double needle to finish the hems. Miriam is covering all of these finishing details, plus more today on her blog, so be sure not to miss it!

Basic Tee Shirt Construction - One Little Minute Blog - adding detail to inside seam

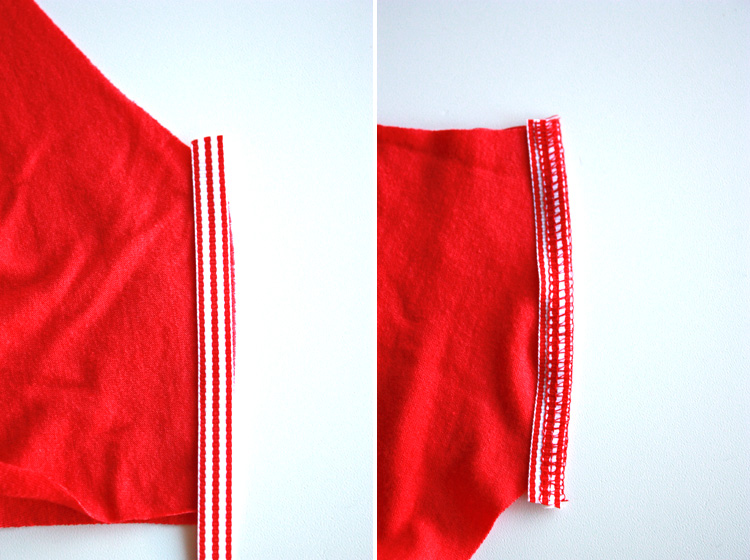
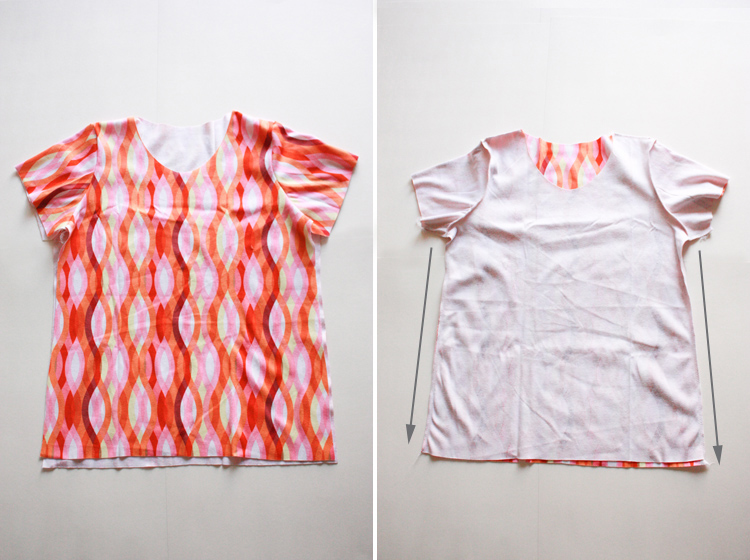
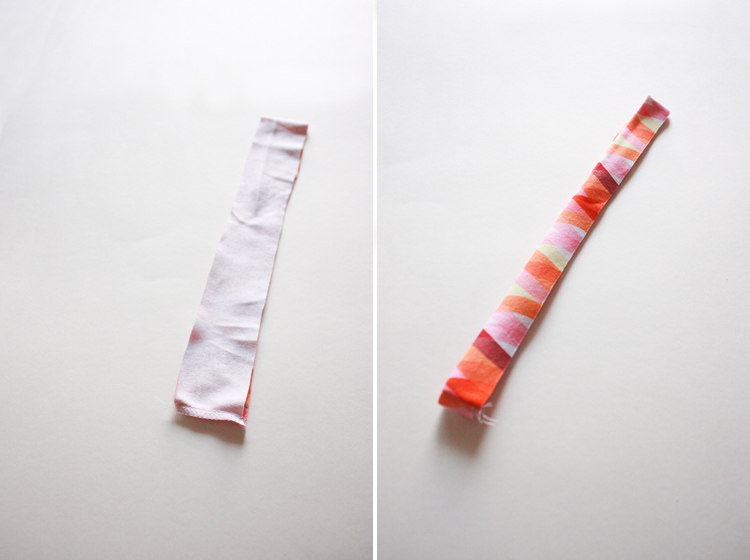
One final thing that I like to do to my projects, though I don’t always, is add a ribbon or strip of bias tape to the back inside neck seam to cover the sewn edge. Take a look at your factory tees. Every single one has this detail added. It is a very simple way to make a homemade garment look professional.

Now, here is an important lesson illustrated by my tee shirt, ALWAYS PRE-WASH YOUR KNITS BEFORE SEWING!!

Constructing a tee- One Little Minute Blog- Oops, it shrunk! Prewash!

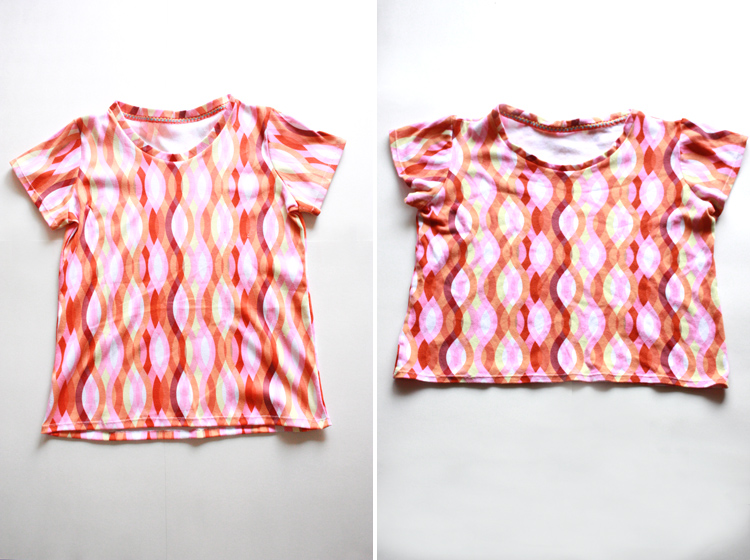
In the past I sort of pre-washed or not, depending on the urgency of the project. This one I obviously didn’t pre-wash and with the first washing it shrunk about 3″ vertically (and 0″ horizontally) effectively transforming it from a “favorite tee” into an “80’s workout tee!” I didn’t have a chance to take photos before, and will spare you the afters. So, I went back and constructed another tee using the pattern I rubbed off of my favorite tee so you can see the fit of both.

Basic Tee Construction - One Little Minute Blog - Finished Tee
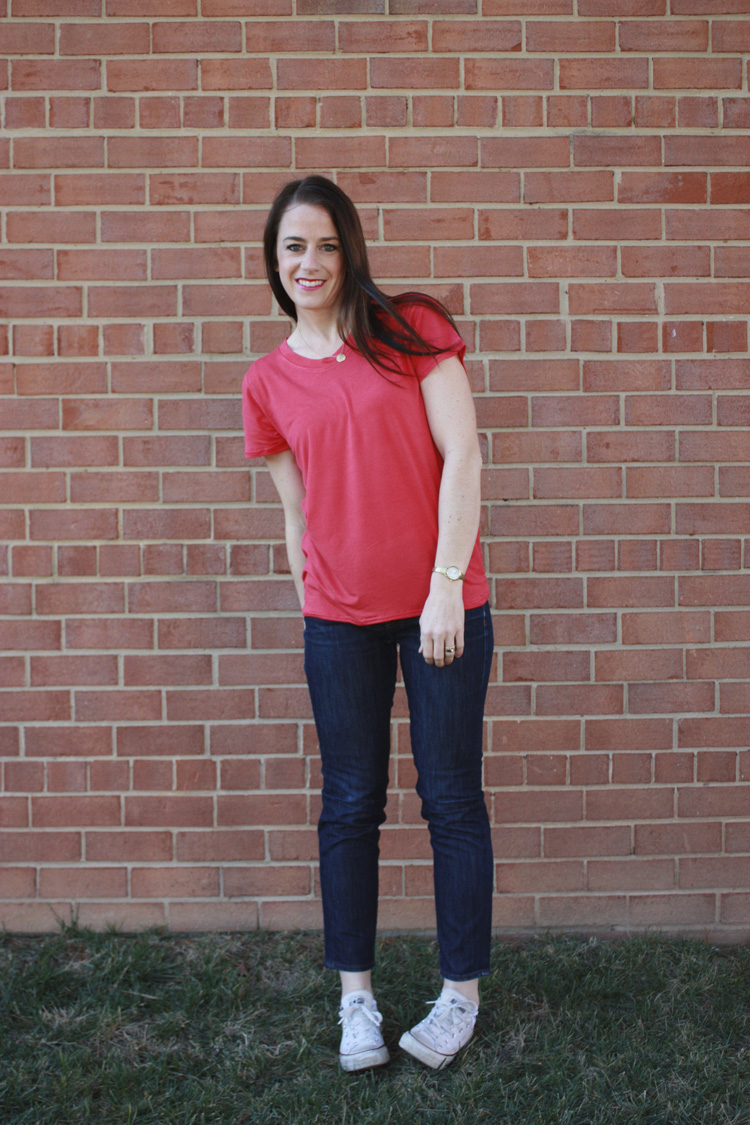
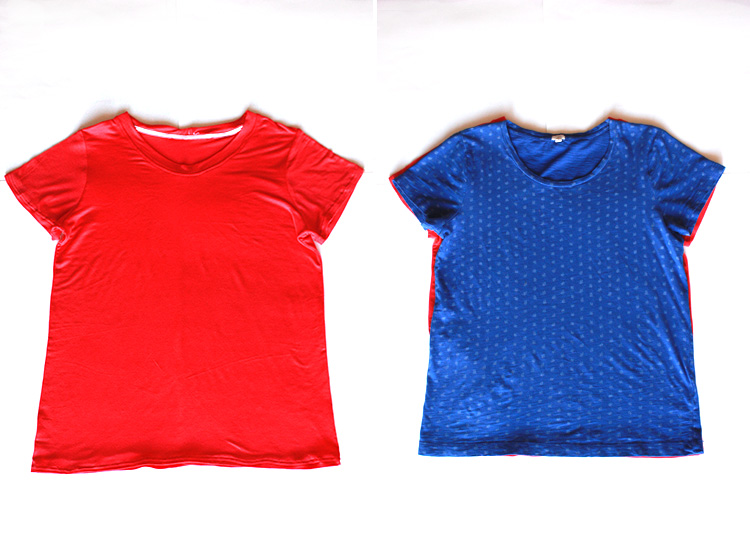
Ta Da! The second “Favorite Tee” made using the rubbed-off pattern, that I actually pre-washed (and have not yet post-washed. Fingers crossed for no more shrinking!)

Basic Tee Construction - One Little Minute Blog - Favorite Tee Remake

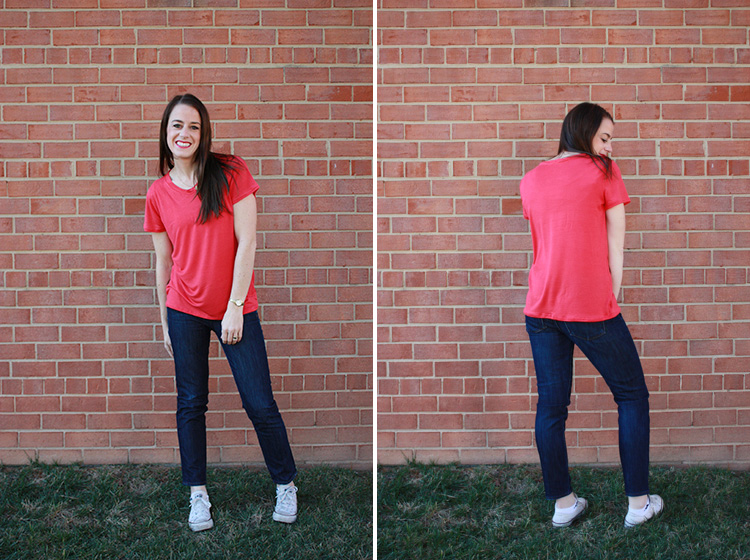
Check it out! Seeing double! The new tee fits just like the old one. I see many more to come. If you made your own pattern from measurements like Mim taught yesterday, your tee will fit exactly as you hope!

Basic Tee Construction - One Little Minute Blog - Favorite Tee Remade Basic Tee Construction - One Little Minute Blog - Make a basic tee, so simple!

Make sure that you catch Miriam’s post on Finishing Techniques for Knits today!

Now that you know how to create a pattern, construct, and finish a basic knit tee shirt, we’re going to teach you a couple fun variations on the tee shirt pattern! Come back tomorrow to learn how to turn your tee shirt pattern into a dress on my blog, or a peplum tee over at Mad Mim!BabyLock Footer- One Little Minute Blog

Share

Sewing DIY  / Stretch Yourself Series

  • ABOUT

    Welcome! I’m Miranda, the maker mama behind Live Free Creative Company.

  • More Than Enough Book


    Have you ever felt like you were running a race you couldn’t win in life? Like there was always something more to buy or to achieve in order for you to feel like you had “made it”?In this book, I share how my heart changed and I began to find real, lasting peace, abundance, and joy through focusing on what matters most and disregarding the rest.

    Find out more here.

  • ConvertKit Form

    Five Days to Freedom: Tips for Choosing Less Stuff and More Adventure in your Daily Life

    Five lessons with practical tips and exercises to help you feel more in control of your life!

    Success!

    There was an error submitting your subscription. Please try again.

    We won't send you spam. Unsubscribe at any time. Powered by ConvertKit
  • Recent on Instagram

    livefreemiranda

    The final episode this year of Live Free Creative The final episode this year of Live Free Creative Podcast dropped this morning: a look back at 2022 and an invitation to reflect. 

Often, it is in the remembering and retelling of our own stories where meaning is made. With a little distance, we can usually see more clearly how our experiences have changed us. This self-awareness is a beautiful place from where we can step into the future with added clarity and hopefully a measure of compassion and peace. 

Tune in on your favorite podcast app. 💛 #livefreecreativepodcast
    This last week of the year is talked about like a This last week of the year is talked about like a Bermuda Triangle of time warp— I think it is the *perfect* time for reflection. Not hustle, goal-setting, or even planning (though I love a good plan😉). 

This is the time to look back with clear and honest eyes on the challenges, joys, disappointments, and fulfillments of the last year and make some meaning of it all. Accepting who and where we are now with grace and love can help us proceed into the next right step with compassion and clarity. 

2022 was one of my personal toughest. It was simultaneously filled with light and laughter. A beautiful mess. 💛

What was one of your favorite moments of the last year? Feel free to share below. I’d love to hear!
    I’ve spent a long time curious about optimism- w I’ve spent a long time curious about optimism- what it really looks like and how it is evidenced in real life. 

Learning about explanatory styles helped clarify some of the nuances of optimistic people acknowledging and accepting negative events and emotions without being taken down by them. 

Optimism is not toxic positivity, it is the perspective that although negative things occur, they are usually temporary, impersonal and specific. 

These illustrations can help you clarify the difference between how an optimist and a pessimist may describe positive and negative events— and listening to episode 217 of Live Free Creative Podcast can help with some practical ideas for building your optimism muscle. 💪😃

#livefreecreativepodcast
    One semester down of the Master of Applied Positiv One semester down of the Master of Applied Positive Psychology program at @uofpenn 🙌. 

After over two decades of interest in and self-study of the ideas of happiness, progress, and what makes life worth living, it has been a dream come true to dive even deeper with the guidance of great professors, guest lecturers, and classmates. It is a ton of work, and also reminds me that most truly worthwhile things are. ❤️

Cheers to lifelong learning, growing, and flourishing! 🌱🌲 

(These are a small sample of the hundreds of pages of books, journal articles, and essays I’ve dug into this semester. All of these are easily accessible, and fun to read. Highly recommend!)

#positivepsychology #selfdevelopmentbooks
#pennpov
    Let’s talk about OPTIMISM! 😊 Many people (fa Let’s talk about OPTIMISM! 😊

Many people (falsely) assume that optimism means ignoring negative events or emotions. Instead, optimism is the perspective with which one views negative emotions and events: as temporary, changeable, and impersonal. 

For (very simple) example, when an optimistic person stubs her toe, she might think “Ouch! That hurts! That step came out of nowhere… I’ll look out for it next time.” 

In contrast, a pessimist might stub her toe and think “Ouch! That hurts! Why do I always get hurt? I’m such a klutz.”

Optimistic people tend to see negative events as occasional, and positive events as the norm. They tune their attention to things that do or could go right, rather than giving all the weight to things that do or could go wrong. 

Additionally, optimism can be LEARNED and PRACTICED, with amazing and beneficial outcomes on life satisfaction, relationships, and overall well-being. 

Do you consider yourself more of an optimist or a pessimist?

Listen to #livefreecreativepodcast this week for a deep dive into Optimism! 🌤️
    Paper Person for LIFE ✌️ I write plans, lists Paper Person for LIFE ✌️

I write plans, lists, to-do’s, outlines, notes, dreams, memories, and stories on good old fashioned paper (preferably 80# cotton mohawk paper with a .3 muji pen 😉).

Did you know research shows that writing by hand (versus typing) activates different parts of the brain and can increase understanding, perception, memory, motor skills, and even creativity? While typing and tech definitely have their benefits, writing by hand, on paper, is still an important, valid, and (in my personal experience) cathartic experience.

If you’ve been around a while, you know @golden.coil is my favorite, (sister-owned) customizable planner and notebook company. 📒

Who else has a paper brain like me? 🙋🏻‍♀️
    What expectations do you have for the holidays? Or What expectations do you have for the holidays? Or for the New Year?

I’d love to hear about them. And invite you to consider how developing appreciate (instead of/alongside) expectation can build your well-being and positive emotions. 

Listen to Episode 216 of #livefreecreativepodcast for a more in-depth discussion. 💚
    Expectations are normal— but are they helpful? Expectations are normal— but are they helpful?

Unmet expectations lead to disappointment on the one end of the spectrum and resentment or even anger on the other. 

In contrast, appreciation increases positivity, motivation, and resilience. 

Neither expectations nor appreciation cost us anything… so which do we want to intentionally invite into our lives? 💛

Listen to Episode 216 for more insights. #livefreecreativepodcast
    One wall, one quart of green paint, three hours of One wall, one quart of green paint, three hours of procrastinating folding laundry: a gorgeous new office space. 💚💁🏻‍♀️

Sometimes we need to JUST GO FOR IT when the urge to improve strikes, even if it doesn’t make sense. Pausing a hundred small to-do’s so you can accomplish one with long-lasting impact feels amazing. 

(I think picking up this incredible @thicketdesign serpent and butterfly painting from @frameofmindrva was the push I needed to make it happen. 😍) 

What small home project would make the biggest positive impact for you right now?

#livefreeabode
    The halls are decked, there’s a log on the fire, The halls are decked, there’s a log on the fire, and a cozy holiday playlist of podcast favorites for the season on the speaker. 🔥👉

Swipe for a list of Holiday Season episodes that will invite some intention, creativity, joy, and magic into your life this season. 🎙️🎁

Find a link to the full Spotify Playlist in the story highlight (after the last couple weeks I KNOW how many of you love Spotify 🤭)

What holiday-themed episode do you want to hear next? Drop ideas in the comments! 

#livefreecreativepodcast #livefreeabode
    Connection builds resilience, reduces stress, and Connection builds resilience, reduces stress, and makes us happier! ✨

While this last year (um…2-3 years? 🫠) has been difficult on many levels, it has also felt very connective. Weird how challenges can do that: build meaning and strengthen relationships. 

Our family has leaned on simple habits routines to deepen our connection: nightly family dinner, walking to school together, weekly dates for Dave and me, family vacation and weekend getaways to leave it all behind and simply have fun together! 

What are you doing to intentionally build/maintain your connection to those who matter most to you? 

(Thank you @mollyhunterphotography for capturing our family so beautifully!)
    Inviting the hygge of the season into this new hom Inviting the hygge of the season into this new home. 🎄

In a lot of ways, 2022 has been one of the toughest years we’ve experienced. From health challenges, family tragedies, and heartbreak to difficult personal growth, we have been just barely keeping our heads above water.

This Christmastime, I am grateful for the hope and peace of accepting and integrating what is, exercising non-judgement and optimism in the face of obstacles, and the power of close friendships and relationships to ease the load. 💛

Sending love and light to you this season, whether hope-filled or heart-wrenching or a little of both. ✨

#livefreeabode
    Load More... Follow @livefreemiranda on Instagram
  • FAVORITE CATEGORIES

    • DIY
    • SEW
    • DECORATE
    • EAT
    • LIFE
    • TRAVEL


© Copyright 2021 Live Free Creative Co | View our Privacy Policy