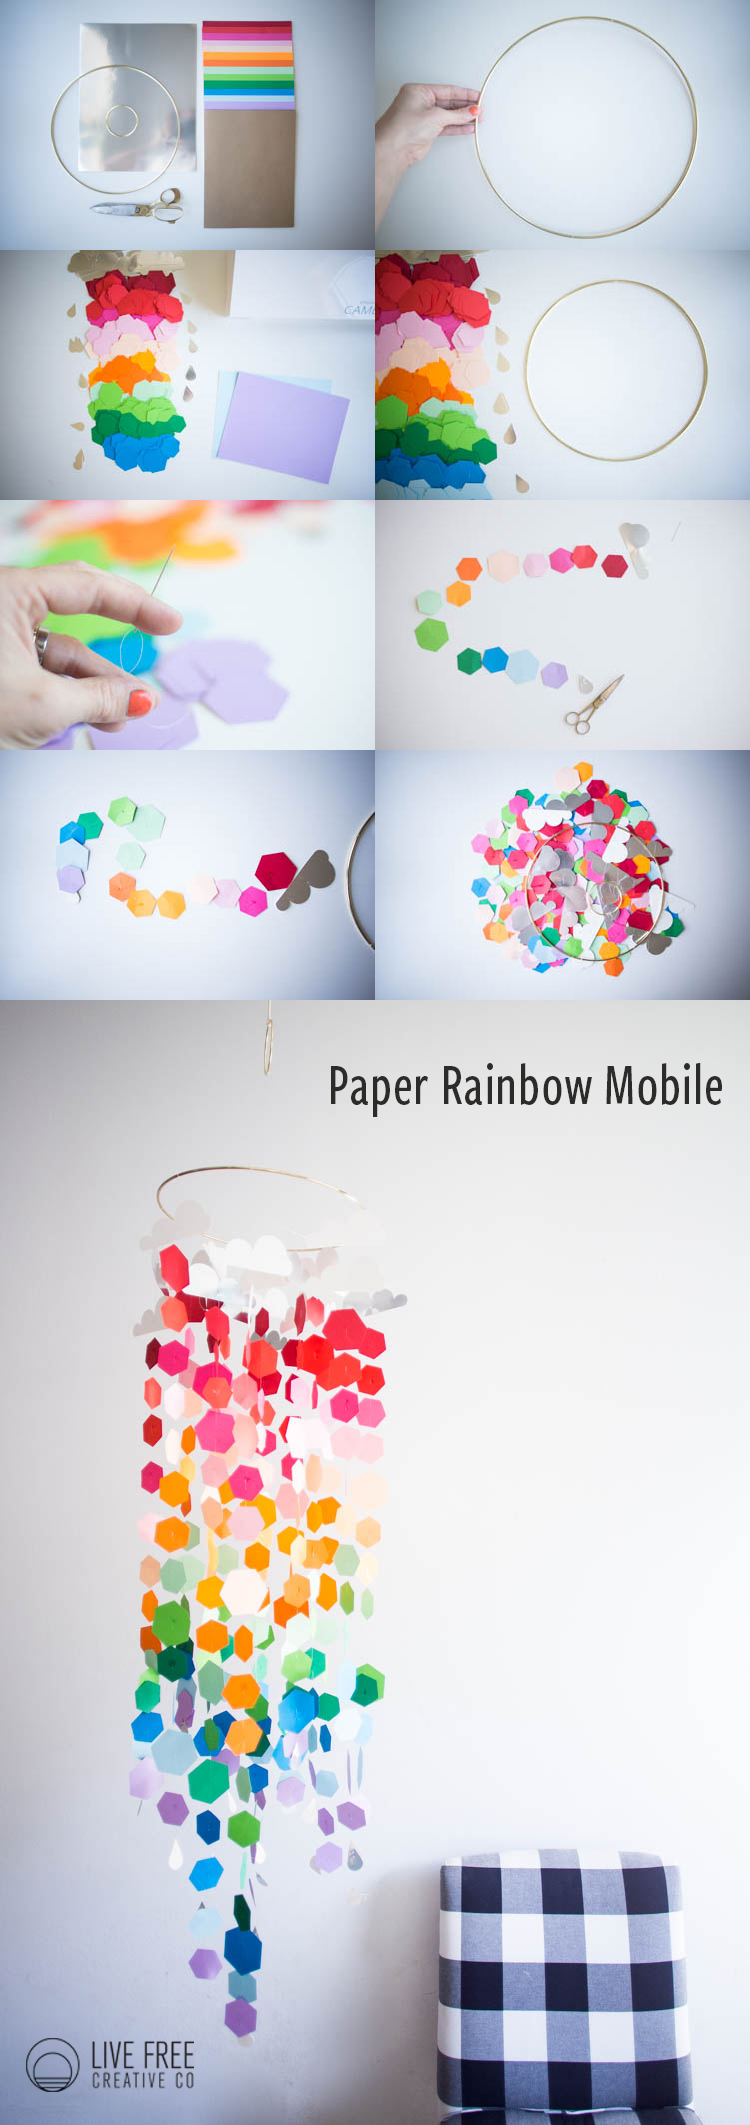
Today is the final Friday in February, which means the last DIY Friday working with paper! Because it has been feeling a lot like spring around here, I decided to celebrate with this bright and colorful paper rainbow mobile.
Paper mobiles are a beautiful and simple way to add some dimension and design to a room, and are not only for the nursery! This version is destined for our playroom, where it will bring a fun burst of happiness all year round.


As I worked on it the colors grew on me more and more, and I’m happy I jumped into a little bit of color! It feels so happy, and creates a really friendly atmosphere. We don’t take ourselves too seriously around here, so my craft projects shouldn’t, either.

I used my Silhouette Cameo 3 to assist in cutting the hundreds of tiny hexagon paper pieces. However, the cutting could also be done by hand with scissors or with some sort of hole punch, if that is what you have.
The brass rings came from a macrame kit that I hadn’t yet finished. They are beautiful, and the DIY would work just as well with an old embroidery hoop or even just a wire hanger twisted into a circle. Get creative, and feel free to use what you have to make it great. You could even get the kids involved in cutting and threading, if they are old enough to do it safely.
So, you ready to get started? Here’s what you need:
Multi-color card stock in whichever colors you prefer
Metallic card stock if you want a little shimmer
At least one 12-14″ ring, another smaller for hanging if you want
Scissors, a large hole punch, or an electronic cutting machine
Fishing line (I literally used ours straight from the fishing pole in the garage!)
A needle
A hot glue gun
- Gather your materials
- Use the fishing line to create eight straight lines across the circle, tying it on to each end. It is hard to see, but you want your hoop to look like a pizza.
- Cut out ten to twenty clouds and small raindrops from the silver or white paper
- Cut out twenty to forty hexagon shaped pieces of card stock in each color.
- Thread a piece of fishing line onto the needle and begin threading the pieces of paper on in the order you would like for one strand. I started with the raindrop, then went through the rainbow backwards, finishing with the cloud.
- After the entire strand is threaded, tie a knot at the bottom so the paper won’t slide off, then tie the top onto the hoop at the end of one of the fishing line lines you created.
- Repeat seven more time, adding a couple extra of one color on some strands if you want, to get a variation in height.
- Once the first eight strands are tied onto the hoop, repeat the steps 5-7 again, but instead of tying the finished thread onto the hoop itself, tie it along one of the fishing lines, midway between the center and the edge.
- Repeat, adding seven more lines of paper to the inside of the hoop. The lines in the center make the mobile feel more full and dramatic.
- Using the hot glue gun, place a small dot of glue on the back of each piece of paper, along the line where you would like it to stay. This will keep the paper from sliding down the line and all ending up at the bottom.
- Finish the mobile by adding two lines of fishing line to the top of the hoop, crossing over each other.
- Tie the second, smaller hoop to the intersection of those two loops. This is where you will hang the mobile.
- Stick a command hook to the ceiling where you would like the mobile to hang, then use some fishing line (or twine) to hang it at the height you prefer.
- Stand back and admire your handiwork. Enjoy your paper rainbow mobile all year round!
Each month in 2017 I am working with a new material for DIY Friday. January was cotton, and I shared: this Pocket Pillowcase, my Sunburst Rope Basket, this Easy Paper Bag Style Skirt, and a simple Upholstered Footstool.
In February I worked with paper and created: these huge Paper Flowers, this cute Armadillo Piñata, an intricate Folk-Art Paper Cut, and today’s Paper Rainbow Mobile.
March starts next week, and I’ll be creating DIY’s with wood! Get excited to break out those power tools!

