Well friends, we’ve made it into May! How did that happen so quickly? For DIYs this month, I’ve decided to focus on linen. Mostly because I made this darling linen tank dress for Plum for Easter, and I wanted to share the super simple DIY.
I love the look and feel of linen. It’s a luxury fabric that is washable, breathable, and so wonderful. The fibers are all natural, made from the flax plant. So, linen is basically the superfood of the fabric world. The material itself has been used for thousands of years. According to Wikipedia, in ancient Egypt, mummies were wrapped in linen cloth to symbolize light and wealth.
Light, rather than wealth, is one of my favorite aspects of linen fabric. It is wonderfully lightweight without being sheer or flimsy. It both washes and dyes super beautifully, and is a great place to begin whipping up a summer wardrobe.
This dress in particular begged to be made of linen fabric. I picked this copper colored linen up last fall, planning to make something for myself. When I never got around to that, and it was time for Easter, I quickly decided copper worked for the spring as well as the fall, especially on my redhead in a field of flowers.
The simple cut and design of the dress allow the richness of the linen fabric to shine, and are super comfy for my girl, too. Not to mention the gathered skirt is perfect for twirling. That’s a big deal for this little one.
I would say this is a great project for an enthusiastic beginner. The lined bodice is an option that I take so that the interior seams are all nice, but it would be even one step more simple simply turing the edges under or using bias binding around the neckline and arms.
Are you ready to make your own linen tank dress? Here’s what you’ll need:
1-2 yards of linen fabric, preached and dried
sewing machine + accouterments
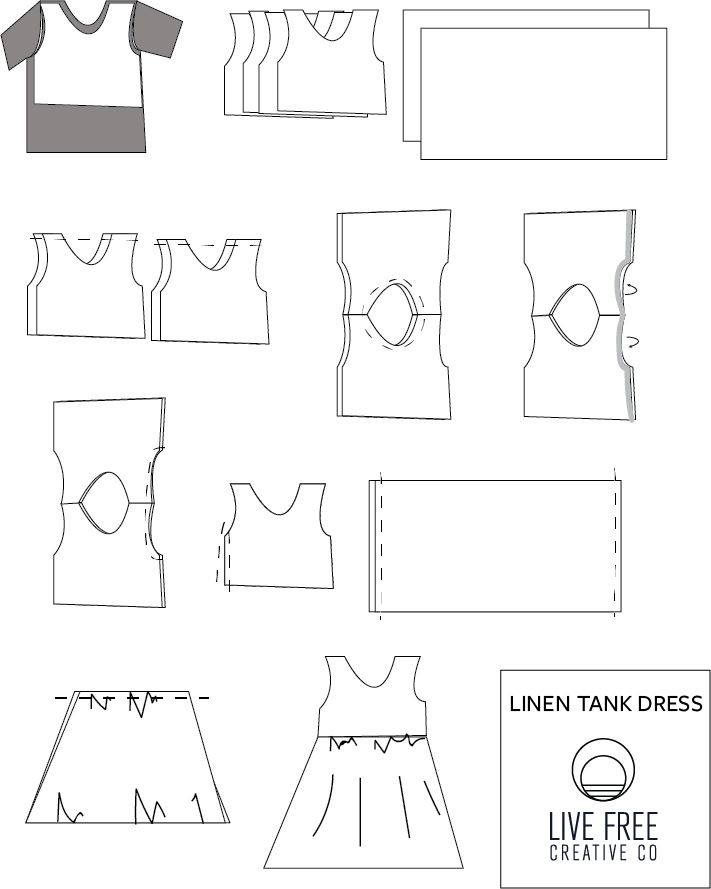
- Trace around the neckline, arms, and sides of a loose-fitting tee shirt. Measure the height from neckline to high-waistline for the length, then add 1/2″ around the entire bodice for seam allowance.
- Make sure the neckline is wide/deep enough to slip over the head.
- Cut 4x the bodice. For the skirt, measure the waistline of the bodice front, and double it, then for the length, measure from waistline to desired hem length. Add 1/2″ seam allowance to the sides, and 1 1/2″ hem allowance to the bottom edge.
- Place two bodice pieces right sides together and stitch at the shoulder seam. Repeat with the lining.
- Place both stitched bodices right sides together and stitch the neckline. Clip and press right side out.
- Turn each edge under 1/2″ and press.
- Stitch around the outside of the pressed arm holes with a 1/4″ seam allowance to make sure you catch the pressed edges.
- Put right sides together of the underarm side seams, and stitch the side seams closed on the inside.
- At this point the stitching on the bodice and lining should be complete, with an open bodice hem.
- Place right sides together on the skirt rectangles and stitch each edge together.
- Gather the top of the skirt using basting stitch. Match the side seams of the bodice and the skirt.
- With right sides together, stitch the skirt and the bodice together at the waistline. Finish the seam with a serger and press.
- Hem the bottom of the skirt by turning it under 1/2″ then 1″, press, then stitch.


